If your eSIM is stuck on activating, it does not always mean the eSIM has failed. In many cases, the eSIM has been installed correctly but has not connected to the destination network yet. This is common with travel eSIMs, especially when the plan only starts after the phone reaches a supported overseas network.
The key is to work out whether the eSIM is still installing, waiting for activation, connected to the wrong data line, blocked by phone settings, or affected by a device or network issue.
Quick Answer
An eSIM is usually stuck activating because the eSIM profile has not finished installing, the phone has not connected to the destination network, or mobile data is still assigned to the wrong SIM.
If the eSIM appears in your phone settings, do not delete it straight away. First, check:
- Mobile data is set to the travel eSIM.
- Data roaming is on for the travel eSIM if required.
- The eSIM line is turned on.
- The phone has been restarted.
- The correct local network has been selected.
- APN settings match the product instructions.
- The phone is not carrier-locked.
- VPN, iCloud Private Relay or private DNS is not blocking the connection.
Always remember that most activation issues can be fixed without removing the eSIM.
Do This First: The 5-Minute Fix
Try these steps before changing advanced settings:
- Connect to stable Wi-Fi.
- Complete any airport, hotel or public Wi-Fi login page.
- Check that the eSIM appears in your SIM or mobile service settings.
- Turn the eSIM line off, wait 10 seconds, then turn it back on.
- Set mobile data to the travel eSIM.
- Turn on data roaming for the travel eSIM if the product instructions require it.
- Turn airplane mode on for 20–30 seconds, then turn it off.
- Restart the phone.
- Open a browser and test a normal webpage.
- If there is still no data, try manual network selection.
If the eSIM is visible in settings, avoid deleting it unless the product instructions or support team tell you to.
What You See and What It Usually Means
| What You See | What It Usually Means | First Thing to Check |
|---|---|---|
| eSIM says activating before departure | The plan may need the destination network before it fully starts | Check the product instructions and wait until arrival |
| eSIM is installed but has no data | Mobile data, roaming, APN or network selection may be wrong | Set mobile data to the travel eSIM |
| QR code says already used | The eSIM profile may already be installed or the QR code may be single-use | Check SIM settings before rescanning |
| No supported network appears | The phone may not be connecting to the correct local carrier | Try manual network selection |
| Phone shows SIM not supported | The device may be carrier-locked | Check carrier-lock status |
| Data works briefly then drops | Network selection, APN, VPN, private DNS or automatic switching may be involved | Turn off VPN/private DNS and check the selected data line |
| eSIM line is visible but switched off | The profile is installed but disabled | Turn the eSIM line on |
| iPhone still says activating but data works | The label may not have refreshed properly | Test data, then restart the phone |
Is the eSIM Actually Stuck?
Not every activating message means something is broken.
There are two different stages:
- Installation: The eSIM profile is being added to the phone.
- Activation: Installed eSIM is trying to connect to a supported mobile network.
A travel eSIM may install before departure but only activate properly once you arrive in the destination country. If you are still in Australia, your Europe eSIM profile won’t be able to connect to its required overseas network yet.
If the eSIM appears in your phone settings, it is usually installed. The issue is more likely to be mobile data selection, roaming, APN, network selection, local coverage or device compatibility.
If the eSIM does not appear in settings, the installation may not have completed, as understanding how an eSIM works means knowing the digital profile must be fully downloaded to be visible. Return to the original setup instructions before scanning the QR code again.
Why This Matters for Overseas Travellers
Travel eSIM setup is now a normal part of pre-flight planning. Australian residents recorded 910,450 short-term overseas return trips in March 2026, up 8.4% from March 2025, according to the Australian Bureau of Statistics.
For travellers, the risk is simple. If the travel eSIM is not selected for mobile data, the phone may keep trying to use the home SIM, connect to expensive roaming, or fail to connect at all.
Many travel eSIMs are data-only plans, meaning they are built for mobile data rather than standard calls and SMS unless the product clearly says otherwise.
A data-only travel eSIM is usually suitable for maps, WhatsApp, Messenger, email, web browsing, and ride-share apps. This is incredibly handy whether you are using a Japan eSIM to navigate transit apps in Tokyo, or relying on a UK eSIM to map out London’s Tube network.
Australian telcos must provide international roaming usage alerts, including alerts at 50%, 85% and 100% of included roaming pack usage. A travel eSIM helps reduce accidental home-SIM data use only when mobile data is assigned to the correct eSIM line.
Before leaving the airport, test maps, messaging, browser access, transport apps and banking apps on mobile data. It is much easier to fix eSIM setup while airport Wi-Fi is still available.
Step-by-Step eSIM Troubleshooting Checklist
Follow these steps in order. Change one setting at a time, then test mobile data before moving to the next step.
1. Check whether the eSIM Is Installed
Open your phone’s SIM or mobile service settings.
On iPhone, go to:
Settings > Mobile Service
or
Settings > Cellular
On Android, go to:
Settings > Connections > SIM Manager
or
Settings > Network & Internet > SIMs
If the travel eSIM appears as a mobile line, it is installed. The issue is likely related to data settings, roaming, APN, destination coverage or network selection. If it does not appear, return to the original installation email and product instructions.
2. Connect to Stable Wi-Fi
An eSIM usually needs a stable internet connection during installation. Airport Wi-Fi, hotel Wi-Fi or another phone’s hotspot can work, but the connection needs to stay active.
If you are using public Wi-Fi, check whether there is a login page. Some airport, hotel and plane Wi-Fi networks will not provide full internet access until you accept the terms or complete sign-in.
And if installation froze halfway through:
- Reconnect to Wi-Fi.
- Complete the Wi-Fi login page.
- Keep the phone unlocked.
- Keep the setup screen open.
- Wait for the process to finish.
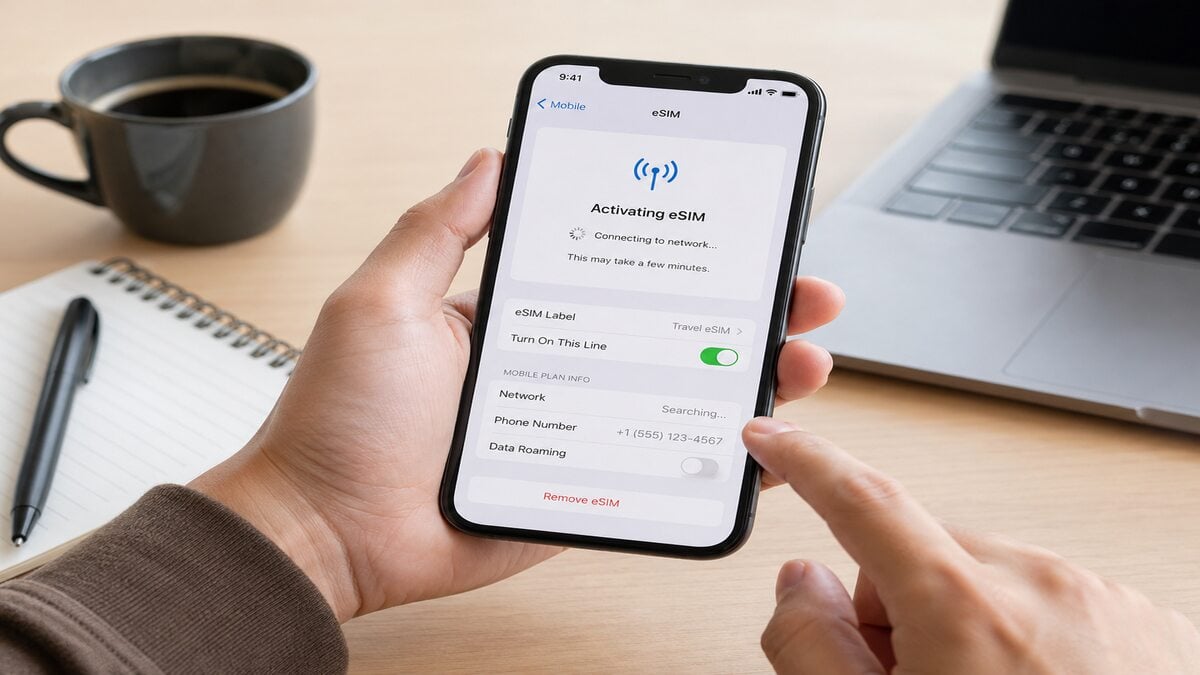
3. Turn the eSIM Line Off and Back On
An installed eSIM can sometimes fail to refresh properly.
Open the travel eSIM line in settings, turn it off, wait around 10 seconds, then turn it back on.
On iPhone, this may appear as Turn On This Line.
On Android, this may appear as a SIM toggle.
Label the line clearly, such as “TravelKon” or “Travel Data”, so it is not confused with the home SIM.
4. Set Mobile Data to the Travel eSIM
This is one of the most common missed steps.
Go to mobile data settings and choose the travel eSIM as the mobile data line. If the home SIM is still selected, your phone may keep trying to use Australian roaming or may show no usable data connection.
Keep the home SIM active only if you need it for calls, SMS or two-factor authentication. Keep home-SIM data roaming off unless you intentionally want to use your Australian mobile plan overseas.
5. Turn on Data Roaming for the Travel eSIM
Many international eSIM products need data roaming switched on for the travel eSIM line. This does not mean turning on roaming for every SIM on your phone.
Open the travel eSIM settings and switch data roaming on if the product instructions require it. Then wait a few minutes and test a webpage.
6. Wait After Arrival
Some travel eSIMs only activate once they connect to a supported local network in the destination country.
If your eSIM says activating before departure, it may not be stuck. It may simply be waiting for the overseas network.
After arrival:
- Turn off airplane mode.
- Turn on the travel eSIM line.
- Set mobile data to the travel eSIM.
- Turn on roaming for the travel eSIM if required.
- Wait up to 10 minutes.
- Test a normal webpage.
Avoid changing too many settings at once.
7. Restart the Phone
A restart can force the phone to refresh its mobile network connection. If a full restart is inconvenient, turn airplane mode on for 20–30 seconds, turn it off, then wait.
8. Check the APN
Some eSIMs need a specific APN. Others configure it automatically. Only enter APN details from the product page, installation email or support team. Guessing an APN can create a new problem.
On Android, manual APN settings are more commonly needed. For those using an iPhone, APN settings may appear under the mobile data network section when editable. After changing APN settings, restart the phone or toggle airplane mode again.
9. Try Manual Network Selection
If automatic network selection does not connect, open the network selection menu and turn off automatic selection. Wait for the available networks to load, then choose a supported network from the product instructions. If the first supported network does not work, try another listed option. It may take a few minutes for the phone to register.
10. Try 4G or LTE Instead of 5G
If the phone connects briefly and then drops, the issue may be linked to 5G availability or local network stability. Try changing the preferred network mode to 4G or LTE, then test mobile data again. This can help in airports, regional areas, crowded cities or locations where 5G signal is weak.
11. Check Whether the Phone Is Carrier-Locked
A locked phone may reject a travel eSIM from another provider.
On iPhone, go to:
Settings > General > About > Carrier Lock
If it says No SIM Restrictions, the phone is unlocked.
If the phone is locked, contact the original mobile provider. A travel eSIM provider cannot usually remove a carrier lock.
Other Fixes Worth Trying
If the eSIM is installed, the correct mobile data line is selected, and the destination network still will not connect, try these extra checks before deleting anything.
Check for iOS or Android Updates
An outdated phone operating system can cause mobile service and eSIM setup issues. If Wi-Fi is available, check whether an iOS or Android update is pending.
However, do not start a major software update on low battery, weak Wi-Fi or just before needing the phone for boarding, transfers, maps or hotel access.
Check Carrier or Network Provider Settings
Some phones receive carrier settings or network provider updates separately from full software updates. If a carrier settings prompt appears, follow the device instructions.
- On iPhone, this may appear as a carrier settings update.
- On Android, the wording depends on the device and mobile network menu.
Set Date and Time to Automatic
Incorrect date, time or time zone settings can interfere with network registration and app access. Set the phone to automatic date and time, then restart the device or toggle airplane mode again.
Turn off VPN, iCloud Private Relay or Private DNS
VPNs, iCloud Private Relay, private DNS and some security apps can make it harder to tell whether the eSIM is failing or the data route is being blocked.
Turn these features off temporarily during setup and testing. Once mobile data is working, turn them back on one at a time if needed.
Remove Old or Unused eSIM Profiles Carefully
Old eSIM profiles can make SIM settings confusing, especially on phones that store several eSIMs. You can remove old, expired or unused eSIMs if you are sure they are no longer needed.
Do not delete the current travel eSIM while troubleshooting unless the product instructions or support team tell you to. Some eSIM profiles cannot be reinstalled after removal.
Reset Network Settings as a Last Resort
Resetting network settings can clear saved Wi-Fi networks, Bluetooth connections, VPN settings and mobile network preferences.
Treat this as a last resort, not the first fix.
Before using this option:
- Save Wi-Fi passwords.
- Keep the eSIM installed.
- Check the product instructions.
- Contact support if you are unsure.
Ask Support whether the eSIM needs to Be Refreshed
If the eSIM appears installed but cannot connect after the correct settings have been checked, our support team may need to review the activation details.
In some cases, the eSIM may need to be refreshed, replaced or reissued depending on the product and error.
iPhone vs Android: What Changes?
The main troubleshooting logic is the same on iPhone and Android, but the settings can look different.
iPhone eSIM Stuck Activating
On iPhone, check:
- The eSIM line is turned on.
- Mobile data is set to the travel eSIM.
- Data roaming is on for the travel eSIM if required.
- Airplane mode has been toggled off and on.
- The phone has been restarted.
- Carrier settings are updated.
- iCloud Private Relay is turned off temporarily.
- The phone says No SIM Restrictions under carrier lock.
- Old unused eSIM profiles are not causing confusion.
Supported iPhones can store multiple eSIMs, so old travel profiles can make settings harder to read. Label the active travel eSIM clearly and confirm the selected data line before leaving airport Wi-Fi.
Android eSIM Stuck Activating
On Android, check:
- The eSIM is enabled in SIM Manager.
- Mobile data is assigned to the travel eSIM.
- Data roaming is on for the travel eSIM if required.
- APN settings match the product instructions.
- Manual network selection has been tested.
- Private DNS and VPN are turned off temporarily.
- Software updates are not pending.
- 4G or LTE has been tested if 5G is unstable.
- The device is unlocked.
Samsung, Google Pixel, OPPO and other Android devices may use slightly different wording. Look for the menu that controls SIMs, mobile data, roaming, access point names and network operators.
How TravelKon Users Should Prepare
TravelKon users should set up the eSIM before departure where the product instructions allow it. This gives enough time to check compatibility, save the QR code, read the setup steps and confirm the eSIM appears in phone settings.
Before leaving Australia:
- Save the installation email offline.
- Screenshot the QR code or manual setup details if permitted by the instructions.
- Confirm the phone supports eSIM.
- Check that the phone is unlocked.
- Install the eSIM on stable Wi-Fi.
- Complete any Wi-Fi login page before setup.
- Label the eSIM clearly.
- Read the destination-specific product instructions.
- Check whether roaming must be on.
- Check whether APN details are required.
- Save TravelKon support details before the flight.
At airport arrival, keep the process simple:
- Turn on the TravelKon eSIM.
- Set it as the mobile data line.
- Turn on roaming for that eSIM if instructed.
- Wait for the phone to connect.
- Test maps, messaging and browser access before leaving the airport.
Keep the eSIM installed unless the product instructions or TravelKon support tell you to remove it.
When to Contact TravelKon Support
Contact our team if:
- The eSIM is installed but still will not connect after the checklist.
- The QR code says it has already been used.
- The phone shows a carrier-lock or unsupported-SIM warning.
- The destination network does not appear.
- Mobile data is being used from the wrong SIM.
- APN settings are unclear.
- The eSIM disappeared from settings.
- Deleting the eSIM seems like the only remaining option.
- The phone connects but hotspot does not work.
- The eSIM worked before departure but failed after arrival.
- Software, date/time, VPN, private relay and network settings checks have not fixed the issue.
Send support:
- Order number
- Destination country
- eSIM product name
- Phone model
- iOS or Android version
- Screenshot of the eSIM line
- Screenshot of mobile data selection
- Screenshot of roaming settings
- Screenshot of APN settings if visible
- Exact error message
- What has already been tried
- EID, IMEI or ICCID if requested
- SM-DP+ address or activation details if using manual setup
Screenshots are useful because they show whether the issue is installation, activation timing, local network selection, APN, roaming, compatibility, device lock status or whether the eSIM needs to be checked by support.
FAQs
Why Is My eSIM Stuck Activating Before Departure?
An eSIM stuck activating before departure may be waiting for a supported network in the destination country. If the eSIM is installed and visible in settings, the plan may not fully connect until arrival. Check the product instructions before deleting or rescanning anything.
Why Is My eSIM stuck on Activating After Installation?
An eSIM stuck on activating after installation may already be installed but unable to connect to the required mobile network. This can happen if you are not in the destination country yet, mobile data is set to the wrong SIM, roaming is off, APN settings are missing, or the phone is carrier-locked.
How Long Should an eSIM Take to Activate?
An eSIM may activate within a few minutes, but timing depends on the device, product, destination network and whether the plan starts before departure or after arrival.
If the eSIM is installed and the settings are correct, wait a few minutes after landing before changing more settings.
Why Is My eSIM installed but Not Working?
An installed eSIM may not work if mobile data is still set to the home SIM, data roaming is off for the travel eSIM, the APN is missing, the wrong local network is selected, the phone is carrier-locked, or VPN/private DNS settings are interfering with the connection.
Can an eSIM be activated before travel?
Some eSIMs can be installed before travel but only fully activate after connecting to a supported network overseas. Always check the product instructions so the plan is not started too early or configured incorrectly.
Should Data Roaming Be On for a Travel eSIM?
Data roaming should be on for the travel eSIM if the product instructions require it. Keep roaming off for the home SIM unless you intentionally want to use your Australian mobile plan overseas.
Should Mobile Data Switching Be On or Off?
For troubleshooting, turn mobile data switching off and manually select the travel eSIM for mobile data. Once the eSIM is working, only use automatic switching if you are comfortable with which SIM the phone may use.
Why Does the QR Code Say It Has Already Been Used?
This usually means the eSIM profile has already been installed or the QR code cannot be reused. Check the phone’s SIM settings before scanning again. If the eSIM is not visible, contact support with screenshots and order details.
Should VPN Be Off When Activating an eSIM?
Turn VPN, iCloud Private Relay, private DNS or similar traffic-routing tools off temporarily during eSIM setup and testing. Once mobile data works, turn those tools back on one at a time if needed.
Why Does My iPhone Still Say Activating Even Though Data Works?
Sometimes the status label does not refresh immediately, even when mobile data is already working. If maps, messaging and web browsing work on the travel eSIM, restart the phone and check again. Do not delete the eSIM just because the label still says activating.
Can I Delete and Reinstall an eSIM That Is Stuck Activating?
Do not delete the eSIM unless the product instructions or support team tell you to. Some eSIM profiles use single-use installation details. If you delete the profile, the same QR code may not work again.
Takeaways
Most eSIM activation issues are fixable once the phone settings, destination network and product instructions are checked in the right order.
Start by confirming that the eSIM is visible in phone settings. Then make sure mobile data is assigned to the travel eSIM, turn on roaming for that eSIM if required, toggle the eSIM line off and on, check APN details, try manual network selection and rule out VPN, private DNS, date/time, software and network settings issues.
Avoid deleting the eSIM too early. If the connection still does not work, contact TravelKon support with screenshots of the key settings so the issue can be checked properly.