If your eSIM activation failed, the safest first step is to check whether the eSIM is already installed before rescanning or deleting it.
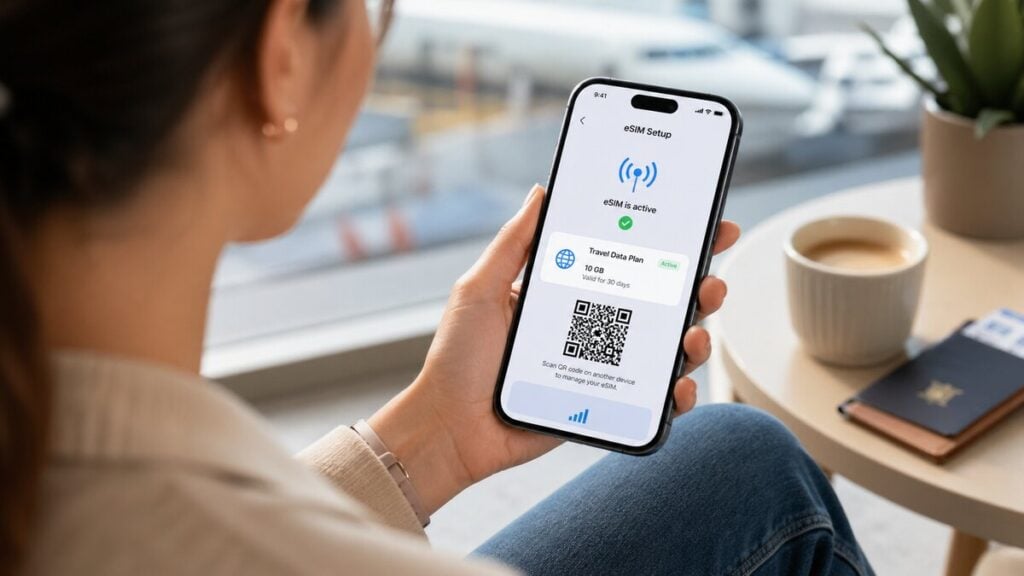
An eSIM activation failed message can make a simple travel setup feel expensive fast. The QR code scans, the phone pauses, and suddenly the data line looks inactive, stuck, or unable to connect.
For anyone who makes several overseas trips, travel eSIMs are a practical way to organise mobile data before departure without relying on airport arrival kiosks or standard roaming. But when activation fails, the next step should be calm and ordered, not random setting changes.
Do This First: Do not delete the eSIM yet. Open your SIM, Mobile Service, Cellular or SIM Manager settings and check whether the eSIM profile is already visible.
What eSIM Activation Failed Usually Means
An eSIM activation failed message usually means the phone could not complete one of three steps:
- Downloading the eSIM profile.
- Installing the eSIM profile on the phone.
- Connecting the installed eSIM to a supported mobile network.
It does not automatically mean the eSIM is broken.
For a travel eSIM, the message can appear before departure because the plan may need to connect to a supported overseas network before it fully starts. After arrival, it may point to mobile data settings, roaming settings, APN details, a carrier-locked phone, a weak signal, a QR code issue, or the wrong SIM being selected for data.
What the Error Message Is Telling You
| Error | What It Usually Means | First Fix |
|---|---|---|
| eSIM activation failed | The phone could not complete download, installation or network activation | Check Wi-Fi, restart, then check whether the eSIM is visible |
| Unable to activate eSIM | The profile may be installed but not connected to the right network yet | Confirm destination coverage, turn on the eSIM line and enable roaming if required |
| This code has already been used | The QR code may have already installed the profile or been consumed | Stop rescanning and contact support with a screenshot |
| Invalid QR code | The code may be expired, opened incorrectly, damaged or not meant for that device | Use the original email and check for manual setup details |
| No Service | The eSIM may not have joined a supported network | Try manual network selection after arrival |
| SOS Only | The phone may have emergency-only access but no active mobile data connection | Check the selected data SIM, roaming and network selection |
| Installed but no internet | The eSIM is present but data is not flowing | Check APN, VPN, Private Relay, Data Saver and Wi-Fi-off testing |
| Hotspot not working | The plan, phone or local network may not support hotspot | Check the product details before changing unrelated settings |
Fix It Fast with this Quick Checklist
Run through these quick checks before changing advanced settings:
- Turn Airplane Mode on for 30 seconds, then off again.
This forces the phone to search for the mobile network again. - Restart the phone.
A full restart can refresh SIM selection, network registration and mobile data settings. - Connect to stable Wi-Fi.
eSIM setup needs an internet connection to download or finish installing the profile. - Check whether the eSIM is visible.
Open Mobile Service, Cellular, SIM Manager or Network settings. If the eSIM appears there, treat it as installed before rescanning anything. - Turn the eSIM line on.
The eSIM can be installed but disabled. - Set mobile data to the travel eSIM.
Make sure the home SIM is not still selected for data overseas. - Enable roaming on the travel eSIM if required.
Only turn roaming on for the eSIM line that needs it. - Check the APN if instructions provide one.
Enter the APN exactly as written. - Turn Wi-Fi off and test mobile data.
Open a simple webpage or maps search to confirm the eSIM is actually handling data. - Stop before deleting the eSIM.
Some QR codes are single-use, so deletion can make recovery harder.
Before Departure vs. After Airport Arrival
A travel eSIM can behave differently before and after reaching the destination. This is where many setup mistakes happen.
Before Departure
Before departure, focus on preparation rather than forcing a live connection. Check that the phone supports eSIM, is unlocked, and matches the product requirements. For someone using a Europe eSIM for instance, saving the installation email somewhere easy to access offline. Read the product instructions for activation timing, destination coverage, APN details, roaming settings and hotspot availability.
If the instructions allow early installation, install on a stable Wi-Fi and stay on the setup screen until the phone finishes. Avoid locking the phone, switching apps repeatedly, moving between Wi-Fi networks, or scanning the same QR code again while setup is still processing.
After Airport Arrival
After airport arrival, focus on network connection.
Turn on the travel eSIM, set it as the mobile data line, enable roaming on that eSIM if required, and wait a few minutes. If automatic network selection does not work, choose a supported local network manually where listed in the product instructions.
Test with Wi-Fi off. Signal bars alone do not prove mobile data is working.
Why Activation Can Fail Even When the eSIM Is Installed
The wording is the confusing part. “Activation failed” sounds final, but eSIM setup has more than one stage.
A phone may download and store the eSIM profile successfully, then fail to connect because the destination network is not available yet. That is common with an international eSIM installed before travel. The eSIM can sit on the phone, ready for use, while still showing inactive, activating, no service, or unable to activate.
A different issue happens when the profile never installs properly. That can be caused by unstable Wi-Fi, an interrupted QR code scan, carrier lock, device incompatibility, too many stored eSIM profiles, or leaving the setup screen too early.
A third issue happens after installation. The eSIM is on the phone, but mobile data is still assigned to the home SIM, roaming is off for the travel line, APN details are missing, or the phone has not joined a supported local network.
A visible eSIM profile usually means the next job is settings and network checks. However, a missing eSIM profile usually means the installation stage needs attention.
For extra setup context before choosing or installing a plan, our guide to how an eSIM works explains how to properly install your eSIM profile.
If the eSIM Is Installed but Has No Data
This is one of the most common travel eSIM problems: the eSIM appears in settings, but apps still do not load.
Work through this order:
- Set mobile data to the travel eSIM.
Dual-SIM phones often keep the home SIM selected unless changed manually. - Turn data roaming on for the travel eSIM if required.
Travel eSIMs often connect through partner networks, so roaming may need to be enabled on the travel line. - Check the APN.
If the product instructions provide an APN, enter it exactly. One wrong character can stop data. - Disable VPN temporarily.
VPNs can interfere with testing. Turn it off, test mobile data, then turn it back on if needed. - Check iCloud Private Relay, Private DNS, Low Data Mode or Data Saver.
These settings can make a working connection look broken. - Try manual network selection.
Choose a supported local network if automatic selection is not connecting. - Turn Wi-Fi off before testing.
Wi-Fi can hide the fact that mobile data is still not working. - Reset network settings only as a last resort.
This can remove saved Wi-Fi networks, Bluetooth pairings and network preferences. Use it only after the safer checks have failed.
iPhone eSIM Activation Failed Checks
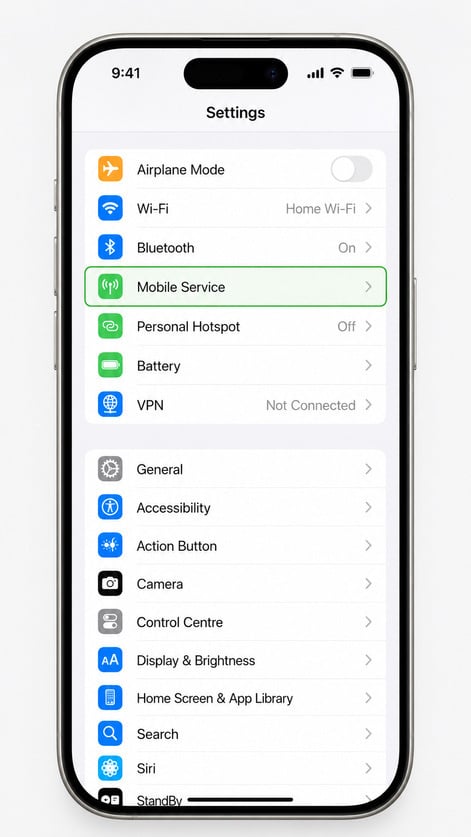
For iPhone, check these settings in order:
- Open Settings > Mobile Service or Settings > Cellular.
- Confirm the travel eSIM appears under SIMs.
- Tap the eSIM and make sure Turn On This Line is enabled.
- Set Mobile Data or Cellular Data to the travel eSIM.
- Enable Data Roaming on the travel eSIM if the instructions require it.
- Toggle Airplane Mode on and off.
- Restart the iPhone.
- Check Settings > General > About for a carrier settings prompt.
- Check Settings > General > About > Network Provider Lock. “No SIM restrictions” means the phone is not carrier-locked.
- Update iOS if a software update is available.
- Turn off VPN or iCloud Private Relay while testing.
- Use manual network selection after arrival if automatic selection fails.
Android eSIM Activation Failed Checks
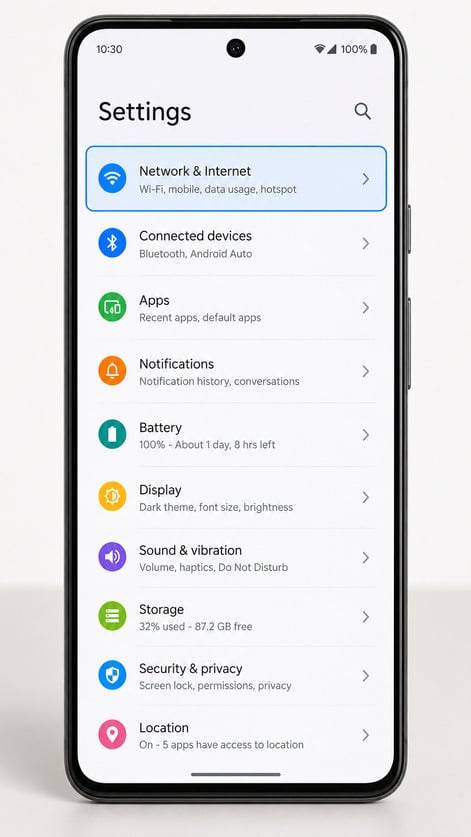
Android wording varies by brand, but the troubleshooting logic is similar.
- Open Settings > Network & Internet, Connections, Mobile Network or SIM Manager.
- Confirm the travel eSIM appears in the SIM list.
- Turn the eSIM line on.
- Set the travel eSIM as the preferred SIM for mobile data.
- Enable data roaming on the travel eSIM if required.
- Toggle Airplane Mode on and off.
- Restart the phone.
- Check for Android system updates.
- Check that date and time are set to automatic.
- Disable VPN, Private DNS, Data Saver or battery restrictions while testing.
- Check APN settings if provided.
- Try manual network selection after arrival.
If the Android phone was bought overseas, imported, supplied by a carrier, or has a regional model variant, confirm eSIM support and carrier unlock status before assuming the plan has failed.
QR Code, Manual Setup, and Already-Used Errors
QR code problems need careful handling because many eSIM QR codes are designed for one installation.
If the QR code will not scan, first check that the original email is open clearly on another screen. Increase brightness, avoid cropped screenshots, and make sure the phone camera can see the full code.
And if the code says it has already been used, stop scanning. The eSIM may already be installed on the phone, or the QR code may have been consumed during a previous attempt. Check the SIM settings before doing anything else.
If manual setup details are provided, enter the SM-DP+ address and activation code exactly as supplied. Copying extra spaces, missing characters or mixing up similar symbols can cause setup to fail.
Lastly, if the code was scanned on the wrong device, contact support before deleting anything. Moving a travel eSIM between devices is often restricted unless the product instructions clearly say otherwise.
What Not to Do After an eSIM Activation Failed Message
- Leave the eSIM installed unless deletion is confirmed as safe. Some eSIMs cannot be reinstalled with the same QR code after deletion.
- Pause before rescanning the same QR code. If the profile is already on the phone, repeated scanning can create extra errors.
- Change one setting at a time. Random changes make the real cause harder to find.
- Check the home SIM before using mobile data overseas. If the home SIM is still selected for data, standard roaming charges may apply.
- Treat carrier-lock warnings seriously. APN edits, restarts and roaming changes will not fix a locked phone.
- Separate mobile data from calls and SMS. A data-only eSIM usually provides mobile data, not standard calls or texts, unless the product details say otherwise.
- Keep a separate plan for urgent calls. Emergency service access can vary by destination, device, network and active SIM setup.
- Read the instructions before the airport queue. Airport arrival is the worst time to discover a locked phone, wrong destination plan, missing QR code email or an unsupported device.
How TravelKon Users Should Prepare
If you are using our travel eSIMs you should prepare in two stages: setup before departure and connection after arrival.
Before departure, save the eSIM installation email, product instructions and manual setup details somewhere easy to access. Check destination coverage, plan validity, data allowance, APN details, roaming requirements and hotspot notes.
Install on stable Wi-Fi if the product instructions allow installation before travel. Some plans can be installed early, while others have activation or validity timing rules. Follow the instructions for the specific product rather than assuming every travel eSIM works the same way.
Check device compatibility before purchase. Confirm the phone supports eSIM, is unlocked, and has not been restricted by the original carrier. If the phone does not support eSIM, a physical travel SIM may be the better option.
After arrival, turn on the TravelKon eSIM, select it for mobile data, enable roaming on that eSIM line if required, then wait a few minutes. If it does not connect, use the checklist above before deleting anything.
Roaming Risk: Make Sure the Right SIM Is Using Data
The biggest cost risk is not usually the eSIM activation failed message itself. It is the home SIM quietly using mobile data overseas.
If the home SIM remains selected for mobile data, standard roaming charges may apply depending on the home provider and plan. Australian roaming rules include alerts at 50%, 85% and 100% of an included roaming value pack, but alerts are not a substitute for checking the selected data line.
Before using maps, banking, browser or rideshare overseas, confirm that mobile data is assigned to the travel eSIM.
When to Contact TravelKon Support
You can contact our support team if:
- The eSIM does not appear in phone settings after installation.
- The QR code says it has already been used.
- The phone shows “SIM not supported”, “cellular plan cannot be added” or a carrier-lock warning.
- The eSIM is installed but will not connect after arrival.
- Mobile data is being used from the wrong SIM.
- Data roaming and APN settings have been checked but mobile data still does not work.
- Manual network selection does not show a supported network.
- Hotspot is needed but does not work after mobile data starts.
- Deleting the eSIM seems like the next step but the instructions do not clearly say it is safe.
Send the useful details first:
- Order number.
- Plan name.
- Destination country.
- Device model.
- iOS or Android version.
- Screenshot of the error message.
- Screenshot showing whether the eSIM appears in settings.
- Screenshot of mobile data selection.
- Screenshot of roaming settings.
- Screenshot of APN settings, if relevant.
- Screenshot of manual network selection, if available.
“iPhone 15, Japan plan, eSIM visible, mobile data set to TravelKon, roaming on, APN checked, still no data after landing at Narita” is much easier to troubleshoot than “it does not work”.
FAQs
What Does eSIM Activation Failed Mean?
An eSIM activation failed message means the phone could not complete the eSIM download, installation or network activation step. If the eSIM is visible in phone settings, it may already be installed and waiting for the correct settings or destination network.
Can eSIM Activation Failed Appear Before Departure?
Yes. A travel eSIM may install before departure but not fully activate until the phone reaches a supported overseas network. Check the product instructions before deleting, rescanning or assuming the plan has failed.
Should Data Roaming Be On for a Travel eSIM?
Data roaming should be turned on for the travel eSIM if the product instructions require it. Make sure roaming is enabled on the travel line, not accidentally on the home SIM, unless the home plan is meant to roam.
What Should Happen if the QR Code Says Already Used?
Stop rescanning and check whether the eSIM is already installed in phone settings. If it is not visible, contact support with a screenshot of the message, order details, device model and destination.
Why Does the eSIM Show Signal but No Internet?
Signal bars mean the phone can see a network, not that mobile data is working. Check the selected data SIM, roaming, APN, VPN, Private Relay, Private DNS, Low Data Mode, Data Saver and manual network selection.
Does a Data Only eSIM Include Calls and Texts?
A data only eSIM usually provides mobile data only. Standard calls and SMS may not be included unless the product details clearly say they are. Internet-based apps can work once mobile data is connected.
Can Hotspot Work on an International eSIM?
Hotspot can work on some international eSIM plans, but it depends on the plan, phone and network. If phone data works but hotspot does not, check the product details before changing unrelated settings.
Should the eSIM Be Deleted and Reinstalled?
Only delete the eSIM when the product instructions or support confirm it is safe. Some eSIMs cannot be reinstalled with the same QR code after deletion.
Takeaways
An eSIM activation failed message is stressful, but it is not a reason to delete profiles or change every setting at once. First, check whether the eSIM is visible. If it is visible, focus on the active line, mobile data selection, roaming settings, APN, Airplane Mode, restart, manual network selection and Wi-Fi-off testing. If it is not visible, treat the issue as an installation or QR code problem.
For TravelKon users, the safest next step is simple: follow the product instructions, protect the eSIM profile, check the correct data line after arrival, and contact TravelKon support with screenshots before deleting or rescanning the eSIM.