A phone showing No Service after an eSIM install can make any trip feel stressful, especially at the airport, in a rideshare queue, or just before needing maps. For travellers using travel eSIMs, the issue is usually not that the eSIM has failed. More often, the phone has not connected to the right network, the wrong SIM is selected for mobile data, roaming is off, or the APN/network settings need a quick check.
Quick Overview of What You Should Do
If an eSIM shows No Service after installation, start with these checks:
- Confirm the eSIM is installed and switched on.
- Make sure the phone is in a supported destination.
- Turn flight mode off, then restart the phone.
- Set mobile data to the travel eSIM.
- Turn data roaming on for the travel eSIM line.
- Temporarily disable the home SIM or other eSIMs.
- Check the APN in the product instructions.
- Try manual network selection.
- Update carrier settings or phone software.
- Contact support before deleting or reinstalling the eSIM.
Note: Avoid deleting the eSIM as the first fix. Some travel eSIM QR codes or activation details may not be reusable.
Getting You Back Online
Try this fast sequence first:
| What to Check | What to Do |
|---|---|
| eSIM line | Make sure the eSIM is turned on in mobile settings |
| Mobile data | Set mobile data to the travel eSIM |
| Roaming | Turn data roaming on for the travel eSIM line |
| Flight mode | Turn flight mode on for 10 seconds, then off |
| Restart | Restart the phone and wait 1–2 minutes |
| Other SIMs | Temporarily turn off the home SIM or other eSIMs |
| Location | Move outside, near a window, or away from basement/airport dead zones |
| Wi-Fi test | Turn Wi-Fi off and load a basic webpage using mobile data |
If the phone still shows “No Service,” continue with the full checklist below.
No Service, SOS Only, or Bars With No Internet?
These problems look similar, but they usually mean different things.
| What You See | Most Likely Cause | Try First |
|---|---|---|
| No Service before departure | The travel eSIM may only connect overseas | Wait until arrival and check product instructions |
| No Service after landing | Wrong data line, roaming off, unsupported network or carrier lock | Set mobile data to the eSIM, turn roaming on, restart |
| SOS Only | The phone cannot register on an allowed mobile network | Try manual network selection and check coverage |
| Signal bars but no internet | APN, mobile data line, VPN, plan status or roaming issue | Check APN, disable VPN, test mobile data only |
| QR code already used | The eSIM may already be installed or the code may be single-use | Avoid deleting it; contact support |
“No Service” is usually a network registration problem. Signal bars with no internet usually points more towards mobile data, APN, roaming, VPN or plan-status issues.
Why eSIM No Service After Installation Happens
A travel eSIM is a digital SIM profile. As such, it does not create mobile coverage by itself but rather lets a compatible, unlocked phone connect to supported partner networks in the destination country.
For instance, if you are relying on a Japan eSIM to access high-speed local data, ensure you are in an area covered by the partner network. If your travels take you elsewhere, such as using an Indonesia eSIM data plan while navigating local markets, the same troubleshooting logic applies.
No Service after installation usually happens when:
- The phone is not yet in the supported destination
- The eSIM line is installed but switched off
- Mobile data is still set to the home SIM
- Data roaming is off for the travel eSIM
- The phone is carrier-locked
- The APN is missing or incorrect
- Automatic network selection has chosen the wrong carrier
- The plan has not started, has expired, or does not cover the country
- The phone is in a poor signal area
- Date and time settings are incorrect
- The phone needs a carrier settings or software update
- Another SIM or eSIM is interfering with network registration
- Advanced network settings such as VoLTE/4G Calling are not registering correctly.
For a data-only eSIM, the main goal is mobile data. Messaging apps, maps, rideshare apps, email, banking apps and browser access can work once the data connection is active. Standard calls and SMS may still depend on the main SIM, an app-based service, or a plan that clearly includes voice and text.
Emergency calling can vary by country, device, local network and SIM state, so a data-only travel eSIM should not be treated as the only emergency option.
Troubleshooting Flow: Start Here
Use this order before changing advanced settings.
- Is the eSIM visible in settings?
If not, return to the installation email or product instructions. - Is the eSIM line turned on?
Make sure the installed eSIM profile is enabled. - Is mobile data set to the travel eSIM?
The phone may still be trying to use the home SIM for data. - Is data roaming on for the travel eSIM?
Many international eSIMs need data roaming enabled because they connect through partner networks. - Is the plan valid for the country?
Check the destination, start timing, expiry date and data allowance. - Does moving location help?
Move outside, near a window, or to another part of the airport/hotel. - Does airplane mode or restart fix it?
Toggle flight mode, then restart the phone. - Does manual network selection fix it?
Choose a supported network listed in the product instructions. - Are APN settings correct?
Use the exact APN from the setup email or product guide. - Are date, time and region settings automatic?
Incorrect time settings can interfere with network registration. - Are carrier settings and phone software up to date?
Install any pending carrier or operating system updates. - Still No Service?
Contact TravelKon support before deleting the eSIM.
Step-by-Step Checklist to Fix No Service
1. Check the Destination and Timing
Some travel eSIMs can be installed before departure but only connect after arrival in a supported destination. For example, travellers using products in our Europe eSIM category should confirm that their specific regional plan covers the exact countries on their itinerary before attempting to connect.
If the phone is still in Australia before departure, No Service on the travel eSIM line may simply mean there is no supported overseas network available yet.
Also check:
- The country is included in the eSIM plan
- The plan has not expired
- The plan has started or is ready to start on arrival
- The data allowance has not been used
- The phone is not trying to connect in an unsupported transit country.
2. Move to a Better Signal Area
Poor indoor coverage can make an eSIM look broken even when the setup is correct.
Move outside, near a window, or away from basement areas, airport corners, lifts, underground train platforms, thick concrete buildings or remote hotel rooms. Wait one to two minutes after moving.
3. Turn Flight Mode Off After Landing
Airport arrival is a common failure point. The phone may still be holding an old network state.
Turn flight mode on for 10 seconds, turn it off, then wait one to two minutes. If No Service remains, restart the phone.
4. Confirm the eSIM Line Is Switched On
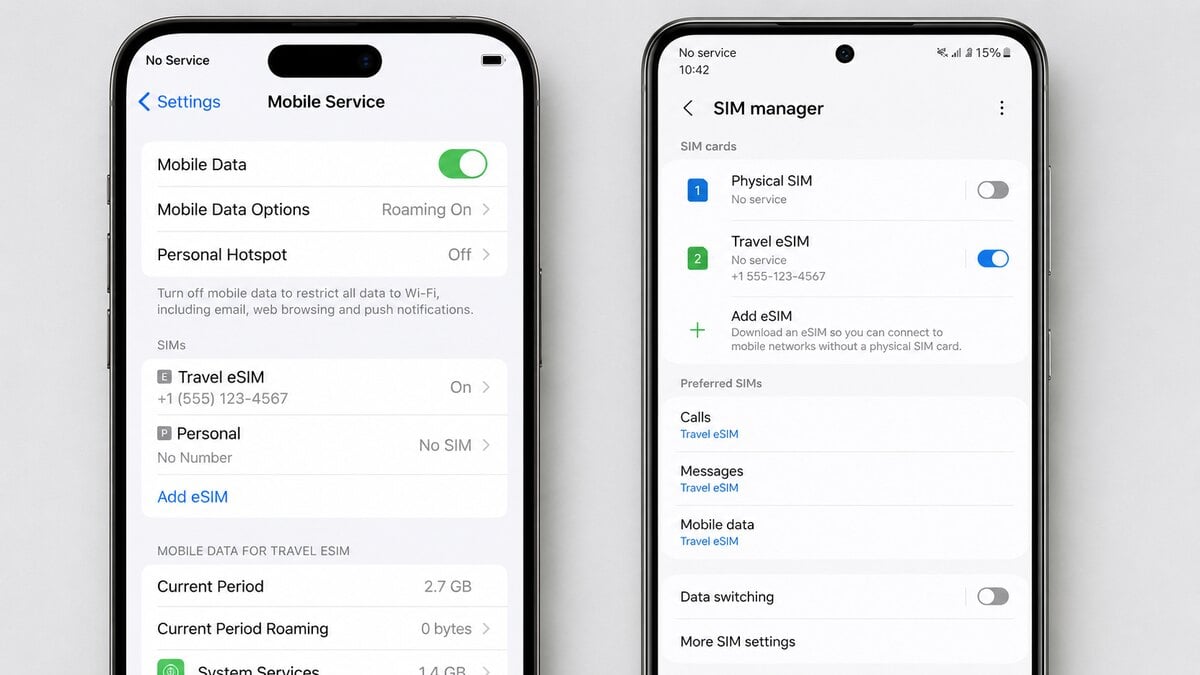
Open the phone’s SIM or mobile network settings and check that the installed eSIM profile is enabled.
On iPhone, this is usually under Settings > Mobile Service or Settings > Cellular.
On Android, look for SIMs, Mobile Network, Connections, or SIM Manager. The exact wording depends on the phone brand.
5. Set Mobile Data to the Travel eSIM
The phone may still be using the home SIM for data.
Set Mobile Data or Cellular Data to the travel eSIM. Turn off automatic mobile data switching while testing so the phone does not silently jump back to the home SIM.
6. Enable Data Roaming on the eSIM Line
For many international eSIM products, data roaming must be on for the travel eSIM because the service connects through partner networks.
Make sure roaming is turned on for the travel eSIM line, not accidentally on the home SIM.
7. Temporarily Disable the Home SIM or Other eSIMs
Dual-SIM settings can cause confusion when the phone keeps trying to use the wrong line.
Temporarily turn off the home SIM or any other eSIMs, then test the travel eSIM by itself. Once mobile data works, turn the other SIMs back on if needed.
8. Check for a Carrier Lock
A carrier-locked phone may reject other SIM or eSIM services.
On iPhone, go to Settings > General > About > Network Provider Lock. It should show No SIM restrictions.
On Android, check the device settings or contact the original carrier to confirm the phone is unlocked.
9. Match the APN to the Product Instructions
APN details tell the phone how to route mobile data.
Use the APN shown in the TravelKon product instructions or installation email. Do not guess, copy settings from another provider, or use random forum values.
If the APN field will not save, restart the phone and try again. If it still will not save, contact support with a screenshot.
10. Try Manual Network Selection
Automatic network selection can choose the wrong local carrier or fail to register.
Turn off automatic network selection, wait for the phone to scan, then choose a supported network listed in the product instructions.
If the first supported network does not work, try the next supported option.
11. Switch From 5G to 4G or LTE
Some roaming profiles connect more reliably on 4G or LTE, especially at airport arrival, indoors, or in areas where 5G roaming is limited.
Change Voice & Data or Preferred Network Type to 4G/LTE, then restart the phone.
12. Check VoLTE or 4G Calling Settings
Some phones show network issues when voice and data settings do not register cleanly on the local network.
If the phone has a VoLTE, 4G Calling, or Voice & Data option, check the product instructions first, then test 4G/LTE mode. For a data-only travel eSIM, voice calling may not be included, but the phone’s network mode can still affect how it registers.
Make one advanced change at a time, restart, then test mobile data again.
13. Set Date and Time Automatically
Incorrect date, time or region settings can interfere with network registration.
Turn on automatic date and time:
- iPhone: Settings > General > Date & Time > Set Automatically
- Android: Settings > System > Date & Time > Set Time Automatically
Restart the phone after changing this setting.
14. Disable VPN, Private DNS and Data-Saving Tools
A VPN, private DNS profile, firewall app, or aggressive data-saving setting can make the eSIM look broken even when the mobile network is available.
Turn these off while testing:
- VPN;
- Private DNS;
- iCloud Private Relay;
- Data saver;
- Firewall apps;
- Work profile or MDM restrictions.
15. Update Carrier Settings and Phone Software
Pending carrier settings or software updates can affect mobile registration.
On iPhone, check Settings > General > About and wait to see whether a carrier settings prompt appears. Also check for iOS updates.
On Android, check for system updates and carrier service updates where available.
Install updates on Wi-Fi where possible.
16. Reset Network Settings as a Late Step
Use this only after the safer steps above.
Resetting network settings can clear saved Wi-Fi passwords, Bluetooth pairings and mobile network preferences. It can help when the phone is stuck with old network settings, but it is not the first move.
After resetting, return to the eSIM settings, confirm the travel eSIM is on, select it for mobile data, turn roaming on, and check the APN again.
17. Test Mobile Data Without Wi-Fi
Turn Wi-Fi off and load a simple webpage using mobile data only.
This confirms whether the eSIM is actually carrying data, rather than the phone quietly using airport, hotel, or café Wi-Fi.
18. Test Hotspot Only After Mobile Data Works
Hotspot can depend on the device, destination, operating system, plan and local network.
First get mobile data working on the phone. Then test hotspot for a laptop, tablet, or second traveller.
iPhone, Samsung and Pixel Settings
iPhone
Check:
- Settings > Mobile Service or Settings > Cellular
- Select the travel eSIM
- Turn on Turn On This Line
- Set Mobile Data to the travel eSIM
- Turn on Data Roaming for the travel eSIM
- Check Settings > General > About for carrier settings
- Try Network Selection manually if automatic selection fails
- Check Settings > General > Date & Time > Set Automatically
Samsung
Check:
- Settings > Connections > SIM Manager
- Turn the travel eSIM on
- Set Mobile Data to the travel eSIM
- Go to Mobile Networks
- Turn on Data Roaming for the travel eSIM
- Check Access Point Names for the correct APN
- Try manual network selection if automatic selection fails
- Check automatic date and time settings
Google Pixel
Check:
- Settings > Network & Internet > SIMs
- Select the travel eSIM
- Turn on the eSIM
- Set mobile data to the travel eSIM
- Turn on roaming
- Check APN settings
- Try manual network selection if needed
- Check automatic date and time settings
What to Do at Airport Arrival
Airport arrival is where many eSIM setup issues appear.
Use this simple sequence:
- Turn off flight mode.
- Move near a window or open area.
- Connect to airport Wi-Fi only if needed to check instructions.
- Confirm the travel eSIM line is on.
- Set mobile data to the travel eSIM.
- Turn data roaming on for the travel eSIM.
- Restart the phone.
- Turn Wi-Fi off and test mobile data.
- Try manual network selection if No Service remains.
- Contact support before deleting the eSIM.
Work through the steps in order so the actual cause is easier to identify.
What You Should Avoid Doing When Your eSIM Says No Service
Deleting the eSIM too early can make the problem harder to fix. Many travel eSIM QR codes and activation details are single-use or controlled by product rules, so deleting the profile can turn a settings issue into a reinstall issue.
Repeatedly rescanning the QR code can also create confusion. If the profile is already installed, repeated scans may trigger an “already used” message.
Roaming should not be enabled on the home SIM unless that is intentional. The correct setting is usually data roaming on the travel eSIM line. Turning roaming on for the home SIM can expose the account to carrier roaming charges.
No Service does not always mean the eSIM has failed. The phone may simply be outside the supported destination, connected to the wrong data line, blocked by a carrier lock, missing APN details, or stuck on an unsupported network.
A data-only eSIM should not be treated like a full mobile plan. Voice calls, SMS, number verification and emergency calling can behave differently.
Hotspot should be tested before relying on it. It can be useful, but it should not be treated as guaranteed unless the product instructions and device settings support it.
Network settings should not be reset too early. Try safer fixes first because reset can remove saved Wi-Fi, Bluetooth and mobile network preferences.
How TravelKon Users Should Prepare Before Departure
TravelKon users should complete the basic checks before leaving Australia, not at the baggage carousel.
Before departure:
- Check that the phone supports eSIM
- Confirm the phone is carrier-unlocked
- Choose the correct country or regional product
- Save the installation email and QR code
- Save manual setup details offline
- Keep the order number handy
- Read the product instructions
- Install the eSIM on stable Wi-Fi
- Avoid deleting the eSIM unless support advises it.
A broader refresher on how an eSIM works can help before choosing an international eSIM, especially if this is the first time using a digital SIM instead of a physical travel SIM.
Once overseas, set mobile data to the TravelKon eSIM, turn roaming on for that eSIM line if required, and wait a few minutes for network registration.
When to Contact TravelKon Support
Reach out to us when:
- The eSIM is installed, switched on and selected for mobile data, but still shows No Service after restart
- The phone is already in the supported destination and manual network selection does not work
- The APN instructions are unclear
- The phone will not save the APN
- The QR code says already used, expired, or invalid
- The device may be carrier-locked
- The plan is active but mobile data still will not load
- Hotspot is essential and the product instructions are unclear.
Ensure that you send these details to our support team from the start:
- Order number
- Destination country
- Phone model
- Operating system version
- Screenshots of the eSIM line
- Screenshot of mobile data selection
- Screenshot of roaming settings
- Screenshot of APN screen
- Screenshot of network selection screen
- Exact error message.
Also include good screenshots reduce back-and-forth and make support faster.
Message Template for TravelKon Support
Use this format when contacting support:
Subject: eSIM Showing No Service After Installation
Issue: eSIM installed but showing No Service.
Order number:
Destination:
Phone model:
Operating system version:
Date and time of arrival:
Current location:
eSIM line turned on: Yes / No
Mobile data set to eSIM: Yes / No
Data roaming on for eSIM: Yes / No
Manual network selection tried: Yes / No
APN checked: Yes / No
Error message shown:
Screenshots to attach: eSIM settings, mobile data selection, roaming settings, APN screen and network selection screen.
Again, please confirm which local networks this eSIM should connect to and whether any settings need to be changed before deleting or reinstalling the eSIM.
Useful Questions to Ask Support
Ask these questions if the issue is not clear:
- Is this eSIM active for the destination?
- Has the validity period started?
- Which local networks should appear in manual network selection?
- Is a specific APN required?
- Should data roaming be on for this product?
- Can the line be refreshed or reissued?
- Should the eSIM be deleted, or should it stay installed?
- Is hotspot supported for this product and destination?
Why This Matters for Travellers
Travel and eSIM use are both growing fast. International tourist arrivals reached 1.4 billion in 2024, while Australian short-term resident returns reached 1,092,380 in April 2026. eSIM-connected devices are projected to grow from 1.2bn in 2025 to 4.9bn in 2030.
That means more travellers are landing with phones that need to register on the right network automatically. When that does not happen, the answer is usually a controlled settings check, not panic, deletion, or random QR rescanning.
FAQs
Why Does eSIM No Service After Installation Happen?
eSIM no service after installation usually happens because the phone has not registered on a supported network. Common causes include being outside the destination, flight mode, the eSIM line being off, mobile data assigned to the wrong SIM, roaming disabled, a carrier-locked phone, incorrect APN details, plan-status issues, poor signal, software issues, or automatic network selection choosing the wrong carrier.
Can an eSIM Show No Service Before Departure?
Yes. A travel eSIM can be installed before departure but may not connect until the phone reaches a supported overseas network. Make sure the eSIM profile is installed and ready, then complete the mobile data, roaming, APN and network checks after arrival.
Why Does My eSIM Say SOS Only After Installation?
SOS Only usually means the phone can detect some mobile network access, but it cannot register normally on the selected network for that eSIM. Try manual network selection, confirm the destination is covered, check the phone is unlocked, move to a better signal area, and contact support if the issue continues.
Should Data Roaming Be On for a Travel eSIM?
Usually, yes, when the product instructions require it. Data roaming on a travel eSIM allows the phone to connect through supported partner networks overseas. Make sure roaming is turned on for the travel eSIM line, not the home SIM, unless home roaming is intentional.
Should the eSIM Be Deleted and Reinstalled?
No, not as a first step. Deleting a travel eSIM can make the problem harder to fix because some QR codes or activation details cannot be reused freely. Try the safe troubleshooting checklist first, then contact support if reinstalling appears necessary.
Can a Data-Only eSIM Make Calls or Receive SMS?
A data-only eSIM is mainly for mobile data. Calls, SMS and number verification may not work unless the plan specifically includes those services. Use internet-based apps for communication where suitable, and keep a backup option for urgent situations.
Can a Hotspot Be Used With an International eSIM?
Often, but not always. Hotspot depends on the device, destination, operating system, local network and eSIM product. First, confirm mobile data works on the phone, then test hotspot before relying on it for a laptop, tablet, or another traveller.
What Should Be Tried Before Resetting Network Settings?
Try flight mode, restart, mobile data selection, data roaming, APN settings, manual network selection, temporarily disabling other SIMs, moving to a better signal area, automatic date and time, and phone software updates first. Reset network settings should come later because it can remove saved Wi-Fi, Bluetooth and mobile network preferences.
Takeaways
eSIM no service after installation is usually caused by settings, timing, coverage, APN, carrier-lock, plan-status, software, signal, or network-selection issues.
Start with the safe sequence: confirm the eSIM is installed and switched on, select it for mobile data, turn roaming on for that eSIM line, restart, check the plan destination, move to a better signal area, confirm APN settings, try manual network selection, then contact support if the issue remains.
For TravelKon users, the best protection is preparation before departure: save the setup email, check compatibility, install on Wi-Fi, read the product instructions, and keep support details handy. Once the correct settings are in place, a travel eSIM can provide practical mobile data overseas without needing to find a local SIM at the airport.