Changing phones can be stressful if your mobile service depends on an eSIM. Carrier eSIMs are more likely to support transfer between phones. However, travel eSIMs are often more restricted and may be tied to the first device they were installed on.
This guide explains how to transfer an eSIM to a new phone, when a transfer is possible, what happens to the old device, and what to do if the QR code does not work.
Can You Transfer an eSIM to a New Phone?
You may be able to transfer an eSIM to a new phone if it is a regular carrier eSIM. Many travel eSIMs should be treated as non-transferable unless the provider or setup notes confirm otherwise.
A carrier eSIM linked to your normal mobile number may transfer through iPhone, Samsung, Google Pixel, or carrier activation tools. This depends on the phone model, operating system, carrier support, region, and whether the old phone is still available.
A travel eSIM or international eSIM is usually more restricted. For instance, if you are moving a dedicated Europe eSIM between devices mid-trip, you might run into activation limits.
If this is a TravelKon travel eSIM that has already been installed, do not delete it from the old phone before checking the activation email, product page, or our support guidance.
| Situation | What It Usually Means | What to Do Next |
|---|---|---|
| You are moving your normal phone plan | Transfer may be available | Use device settings or contact your carrier |
| You are moving a travel eSIM | Transfer may not be supported | Check the activation email first |
| You already deleted the eSIM | Reinstallation may not work | Contact support with your order details |
| Your new phone will not scan the QR code | The code may already be used | Stop rescanning and ask support |
| Your old phone is lost, wiped, or traded in | Transfer may need provider help | Contact the carrier or eSIM provider |
Important: Keep the eSIM installed on the old phone until the new phone is connected and working. If the eSIM is a travel eSIM, deleting it too early may prevent reinstallation.
Quick Checklist Before Transferring an eSIM to a New Phone
Before attempting an eSIM transfer, check the following:
- Your new phone supports eSIM.
- Your phone is unlocked.
- The old phone is still available.
- Both devices have a stable internet connection.
- Bluetooth is enabled if transferring between phones.
- Your carrier or eSIM provider supports transfers.
- You have access to the original activation email or QR code.
- You know whether the eSIM is a carrier plan, travel eSIM, or data-only eSIM.
Carrier eSIM vs Travel eSIM vs Data-Only eSIM
| Feature | Carrier eSIM | Travel eSIM | Data-Only eSIM |
|---|---|---|---|
| Uses your normal phone number | Usually | Usually not | Usually not |
| Transfer supported | Often | Sometimes | Depends on the provider |
| QR code reusable | Depends on the carrier | Often no | Depends on the provider |
| Calls and SMS | Usually | Depends on the plan | Usually no |
| Carrier assistance available | Yes | Provider specific | Provider specific |
| Risk of losing access after deletion | Lower | Higher | Medium |
As mentioned earlier, while a local carrier plan might allow multi-device shifting, a prepaid Japan travel eSIM bought for a short holiday is typically locked to the hardware of your initial device.
How to Transfer eSIMs Across Different Phone Brands
Moving your eSIM profile to a new device varies significantly by manufacturer, so select your specific brand setup below:
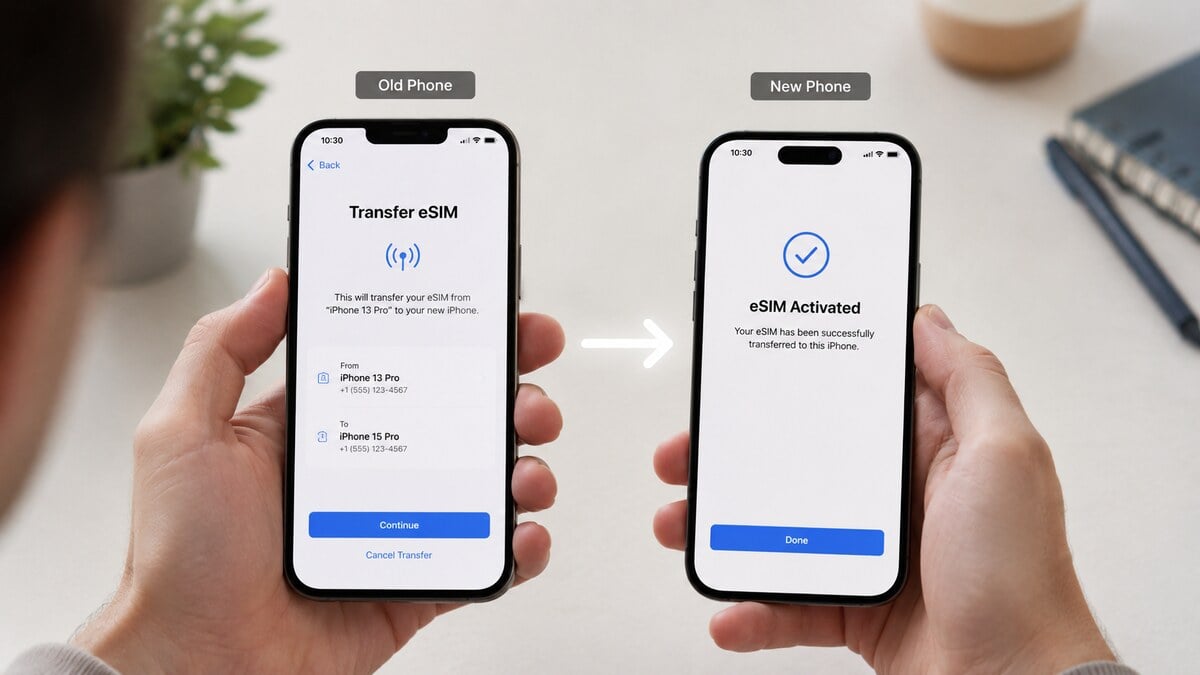
Transferring an eSIM from iPhone to iPhone
If your carrier supports eSIM Quick Transfer, use these steps to move your profile across seamlessly.
Prerequisites:
- Place both iPhones next to each other.
- Connect both devices to a stable Wi-Fi network.
- Ensure Bluetooth is switched on.
Procedure:
- Open Settings > Mobile Service (or Cellular) on the new iPhone.
- Tap Add eSIM.
- Choose Transfer From Nearby iPhone if the option appears.
- Complete the on-screen instructions on both devices.
- Wait for the network signal to appear, then test calls, SMS, and mobile data before wiping your old phone.
After a successful transfer, the eSIM is automatically deactivated or removed from the old device. If the option does not appear, your carrier, region, or iOS version may not support Quick Transfer. Do not delete your old eSIM before contacting your provider.
How to Transfer an eSIM from Android to iPhone
While cross-ecosystem transfers require specific software support, many major carriers allow direct Android-to-iPhone migration natively during device setup.
- On your new iPhone, navigate to Settings > Mobile Service (or Cellular).
- Tap Add eSIM and select Transfer from Android from the options list.
- A unique setup QR code will appear on your iPhone screen.
- Open the camera on your old Android device and scan the iPhone screen to initiate the secure digital handshake.
- Choose the phone number you want to migrate on your Android screen, then tap Transfer.
- Wait for the network signal bars to disappear from the Android phone and activate on your new iPhone.
Note: This direct feature requires a compatible Android device and an iPhone running iOS 26 or later. If your carrier or region doesn’t support native cross-platform switching, you will need to log into your carrier’s app or website to generate a traditional activation QR code.
How to Transfer an eSIM from iPhone to Android
Moving a profile from iOS to Android no longer requires a manual carrier intervention, provided both devices are updated and your network provider supports direct cross-platform migration.
- Go to Settings > Network & Internet > SIMs on your new Android device and select Transfer SIM from another device, choosing iPhone as the source.
- On your old iPhone, go to Settings > General > Transfer or Reset iPhone and select Transfer to Android.
Apple Support - Use your iPhone’s camera to scan the setup QR code displayed on the new Android screen.
- Select the specific mobile number on your iPhone, then double-click the iPhone’s side power button to approve the encrypted transfer.
- Follow the remaining prompts on your Android screen to finish installing the profile.
- Turn off Wi-Fi on the new Android device to test outbound calls, SMS, and mobile data routing.
Travel eSIM Tip: Automated device-to-device switching is typically restricted to major post-paid consumer networks. If you are using a prepaid travel or roaming eSIM, do not attempt this method; you must check the provider’s app to see if your original activation profile can be reused.
How to Transfer an eSIM Between Samsung Phones
On Samsung Galaxy devices:
- Open Settings.
- Tap Connections.
- Tap SIM Manager.
- Select Add eSIM.
- Follow the transfer or activation prompts.
- Verify that the mobile network connects correctly.
- Confirm mobile data is assigned to the transferred eSIM.
Some carriers may require a new activation instead of a direct phone-to-phone transfer. If you are using a travel eSIM, treat SIM Manager as a settings area, not a guarantee that transfer is supported. Confirm transfer support before removing the old profile.
How to Transfer an eSIM on Google Pixel
On Google Pixel:
- Open Settings.
- Tap Network & Internet.
- Tap SIMs.
- Tap Add SIM.
- Select the available transfer or download option.
- Follow the setup prompts.
- Wait for activation.
- Test mobile data, calls, and SMS.
Pixel eSIM transfer support depends on the phone model, Android version, carrier, and region. A transfer option for a regular carrier plan does not automatically apply to a travel eSIM.
What is the Difference between eSIM Transfer and eSIM Reinstall?
Transferring an eSIM means moving an active profile from one phone to another through supported device, carrier, or provider tools. On the other hand, reinstalling means using the QR code or manual activation details again on another phone.
With global eSIM adoption expanding by 30% this year alone, surging from 1.2 billion in 2025 to 1.5 billion active connections worldwide, understanding this distinction is more critical than ever.
Many eSIM troubleshooting problems happen because travellers assume transfer and reinstall mean the same thing. For regular carrier eSIMs, transfer may be supported through phone settings or carrier activation. For many travel eSIMs, the QR code may be single-use.
Step-by-Step Checklist Before You Transfer an eSIM
Use this checklist before deleting, resetting, or rescanning anything.
1. Confirm What Type of eSIM You Have
Start by identifying whether the eSIM is:
- Your regular mobile plan from your home carrier.
- A travel eSIM used for overseas mobile data.
- A data-only network profile, like a local Indonesia eSIM with no standard voice calls or SMS.
- A regional or international eSIM for multiple destinations.
2. Check whether the New Phone Supports eSIM
Do not rely only on the phone name. Different models, regions, and carrier variants can behave differently.
Check for an EID in your phone settings. On many phones, this sits under Settings, About, Mobile Network, Cellular, or SIM Manager. If there is no EID, the phone may not support eSIM.
Also, check that the phone is unlocked. A carrier-locked phone may block an overseas travel eSIM even if the device technically supports eSIM.
3. Keep the Old Phone Available
If the old phone still works, keep it nearby with Wi-Fi on and enough battery. Phone-to-phone eSIM transfer tools often need both devices present. But if the old phone is lost, broken, wiped, or traded in, stop and contact the eSIM provider or carrier.
4. Check the QR Code Rules Before Rescanning
Again, a QR code is not always reusable. Some eSIM QR codes are one-time installation codes. If your travel eSIM has already been installed on the old phone, rescanning the same QR code on the new phone may fail. Before scanning again, check the original email, product page, installation guide, and setup notes.
5. Set the Correct Line for Mobile Data
After installation or transfer, the eSIM may be present but not selected for data.
Open mobile data settings and choose the travel eSIM as the data line. Keep your regular SIM available for calls and SMS if needed, but make sure data is not still assigned to your home SIM if the goal is to avoid roaming charges.
6. Review Roaming Settings
For travel eSIMs, data roaming often needs to be on for the eSIM line. This can feel counterintuitive, but many travel eSIMs connect through partner networks overseas.
The important detail is line selection. Turn roaming on for the travel eSIM if the setup notes require it. Avoid enabling roaming on your home SIM unless you intend to use your home carrier’s overseas roaming.
7. Wait, Restart, and Test
After setup, give the phone time to connect. At airport arrival, the network may take a few minutes to register.
Try this order:
- Turn airplane mode on and off.
- Restart the phone.
- Confirm mobile data is set to the travel eSIM.
- Confirm roaming is enabled on the correct eSIM line.
- Check the APN if the product page lists one.
- Manually select a supported network if automatic selection fails.
- Test with a basic webpage or messaging app before relying on maps, rideshare, or hotspot.
What Happens to the Old Phone After an eSIM Transfer?
In most cases, a successful eSIM transfer deactivates the profile on the old phone.
Before wiping, selling, trading in, or resetting the old device:
- Test outbound calls.
- Check if mobile data works.
- Verify SMS works.
- Ensure banking verification codes arrive.
- Test WhatsApp and other messaging apps.
- Try the hotspot if required.
- Confirm your travel eSIM connects to the correct overseas network if abroad.
Only erase the old phone after the new phone is fully operational.
Why eSIM Transfer Often Gets Confusing
eSIM transfer gets confusing because phones, carriers, and travel eSIM providers do not all follow the same process.
One person may transfer a carrier eSIM from iPhone to iPhone in a few taps. Another person may need carrier verification. Someone using a travel eSIM may not be able to transfer the installed profile at all.
The phone settings can also make this confusing. Seeing Add eSIM, Transfer eSIM, or Use QR Code does not always mean your specific eSIM can be moved.
If the basics still feel unclear, read our guide on how an eSIM works before changing settings.
What Not to Do When Your eSIM Stops Working
Deleting the eSIM too early is the biggest avoidable mistake. If the eSIM profile disappears from the old phone before the new phone is connected, recovery may depend on the provider’s rules.
A carrier-lock warning should not be ignored. A locked phone can block the use of an international eSIM, even when the phone has an eSIM menu.
Do not assume emergency calls, SMS, or two-factor authentication will work the same way through a data-only eSIM. Keep your regular SIM active where possible, check local emergency arrangements, and make sure important banking or airline verification methods are available before departure.
Avoid changing APN, network selection, VPN, and roaming settings all at once. Change one setting, test, then move to the next step. Random changes make troubleshooting harder.
Factory resets should be a last resort. A reset can remove settings, erase profiles, or create a bigger recovery job.
How TravelKon Users Should Prepare
If you’re using our travel eSIM, you should separate the phone change from the travel setup. The best time to sort this out is before departure, while Wi-Fi, email, and support access are easy.
Save the installation email somewhere accessible from both phones. Keep the QR code, manual setup details, order number, destination, and product name handy.
Before installing, check that the new phone supports eSIM and is unlocked. Also, confirm that the product matches your destination and travel dates.
Install on a stable Wi-Fi where possible. Airport Wi-Fi, hotel captive portals, and weak public networks can make setup more stressful than it needs to be.
Read the setup notes before scanning. Some of our products may have specific activation timing, APN details, supported networks, roaming settings, or hotspot rules.
If you intend to use hotspot, check the product page before relying on it. Some plans allow hotspot or tethering, while others may have limitations based on the product or network.
If the eSIM is already installed on your old phone and you now need it on a new one, contact our support team before deleting it. Provide the order details and explain whether the old phone still works.
When to Contact TravelKon Support
Stop guessing and contact our team when any of these apply:
- The eSIM is already installed on the old phone and the new phone will not accept the QR code.
- The old phone has been lost, damaged, wiped, or traded in.
- The new phone shows no EID or no Add eSIM option.
- The phone says the SIM is not supported or the device appears carrier-locked.
- Mobile data is set to the eSIM, roaming is on, and there is still no connection after restarting.
- The eSIM connects to a network but data does not load.
- The hotspot option is missing or connected devices cannot access the internet.
- You are overseas and need mobile data urgently at airport arrival.
Include useful details from the start:
- Screenshot of the eSIM error message.
- Screenshot of the SIM Manager, Cellular, or Mobile Service screen.
- Screenshot showing which line is selected for mobile data.
- Screenshot of APN settings if the product lists an APN.
- Phone model and operating system version.
- Destination country.
- Order number.
- eSIM product name.
- Whether the old phone is still available.
- Steps already tried.
Clear details help support identify whether the issue is transfer, installation, activation, roaming, APN, device compatibility, or carrier lock related.
FAQs
Can You Transfer an eSIM to a New Phone After Installing It?
Sometimes, but not always. A regular carrier eSIM may transfer through device settings if supported by the phone and carrier. A travel eSIM may not be transferable once installed, especially if the QR code is single-use. Check the activation email before deleting or rescanning.
Can You Transfer a Travel eSIM to a New iPhone?
It depends on the travel eSIM provider and product rules. iPhone has eSIM transfer and QR code setup features, but those tools do not override provider restrictions. If the travel eSIM is already installed on another phone, check support guidance first.
Can You Transfer a Travel eSIM to Samsung or Pixel?
Possibly, but only if the provider and device setup allow it. Samsung and Pixel phones may support eSIM transfer for some carrier plans, but that does not mean a travel eSIM QR code can be reused. Check the setup notes before deleting the old profile.
Can I Transfer an eSIM Without My Old Phone?
Sometimes. If the old phone is lost, damaged, wiped, or unavailable, the carrier or eSIM provider may need to issue a new activation profile. Availability depends on the provider’s policies.
What Happens if You Delete a Travel eSIM?
Deleting a travel eSIM can remove the installed profile from the phone. Some eSIMs cannot be reinstalled with the same QR code after deletion. If the eSIM is not working, keep it installed and troubleshoot settings before removing it.
Can a Data-Only eSIM Make Calls or Receive SMS?
A data-only eSIM is mainly for mobile data. Calls, SMS, voicemail, and emergency service behaviour can vary by phone, destination, and active SIM setup. Keep your regular SIM available for important texts and account verification where possible.
Should You Install a TravelKon eSIM Before Departure?
In many cases, yes, but read the setup notes first. Installing before departure can reduce airport stress, especially when Wi-Fi is available. Some plans activate only after connecting to a supported destination network, while others may have different activation rules.
Can You Reuse a Travel eSIM QR Code?
Sometimes, but you should not assume so. Many travel eSIM QR codes are single-use. If the QR code has already been installed on one phone, it may not work on another phone. Check the activation email, product page, or support guidance before rescanning.
Takeaways
To transfer an eSIM to a new phone safely, start with the type of eSIM. Carrier eSIMs may move through built-in phone tools, carrier apps, or provider activation systems. Travel eSIMs and data-only eSIMs need more caution because many are tied to the first device installation.
Keep the old phone and eSIM profile in place until the new setup is confirmed. Check compatibility, carrier lock status, mobile data selection, roaming settings, APN details, and setup notes before making changes.
Before changing phones, keep your TravelKon installation email saved, confirm your device is unlocked, and choose the right eSIM for your destination before departure.
If anything does not behave as expected, contact TravelKon support with screenshots and order details before deleting the eSIM.