Esim Guides

SM DP+ Address

What Is an SM-DP+ Address?

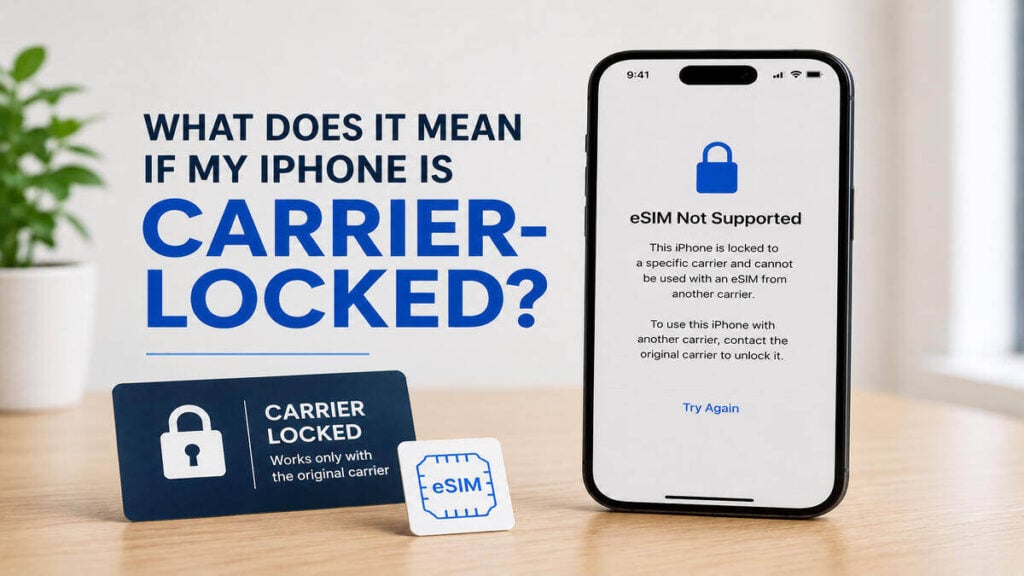
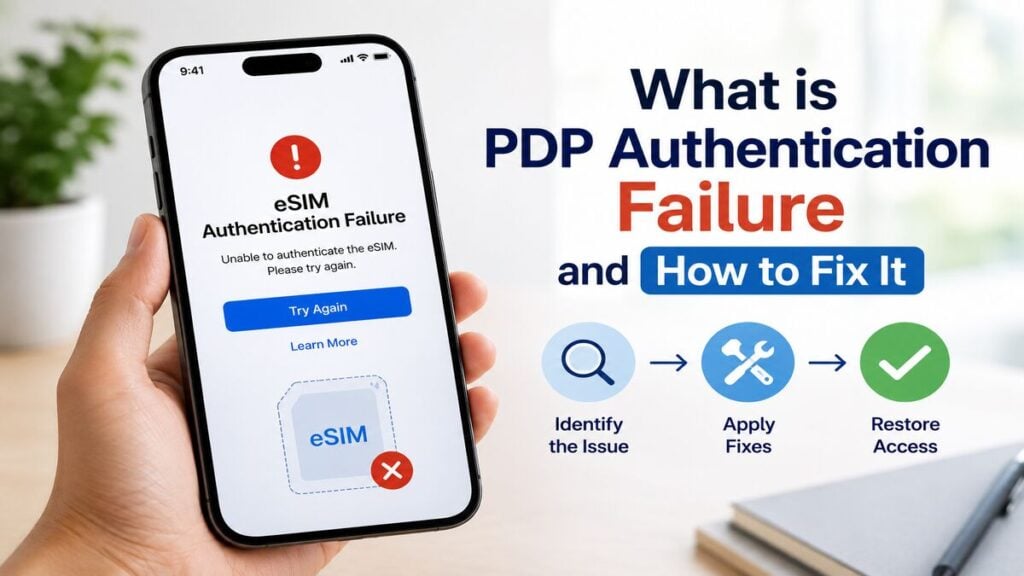
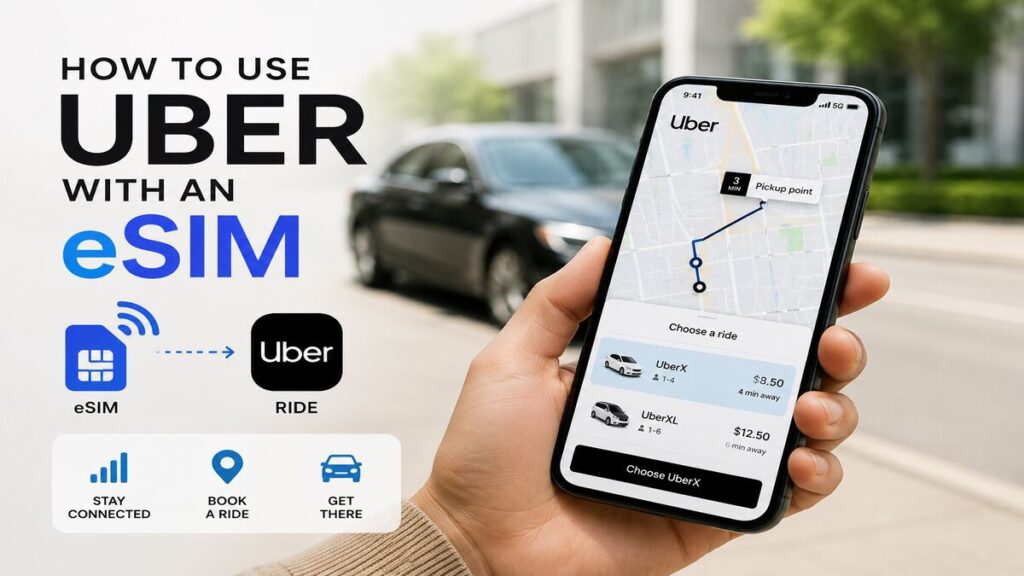
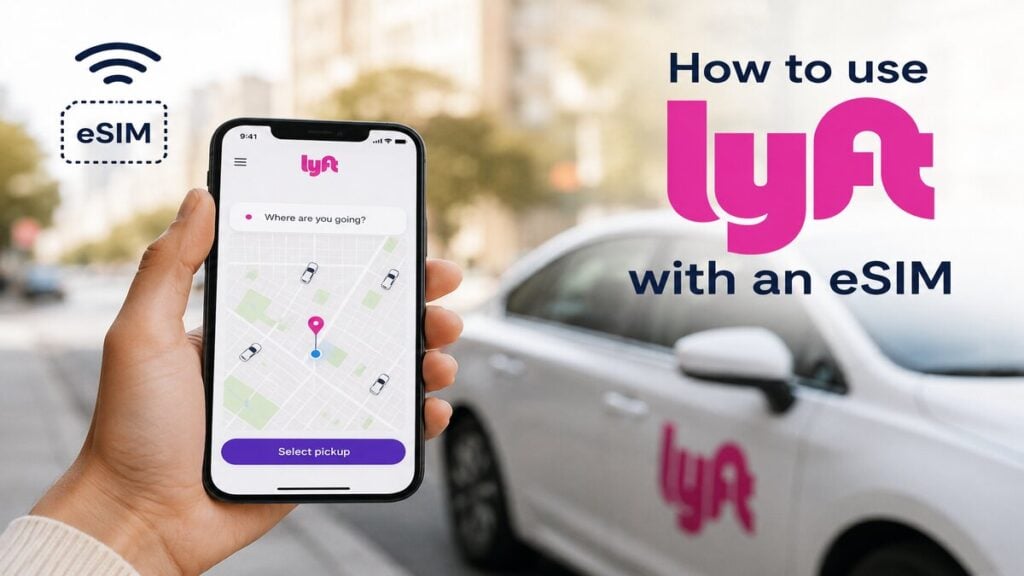
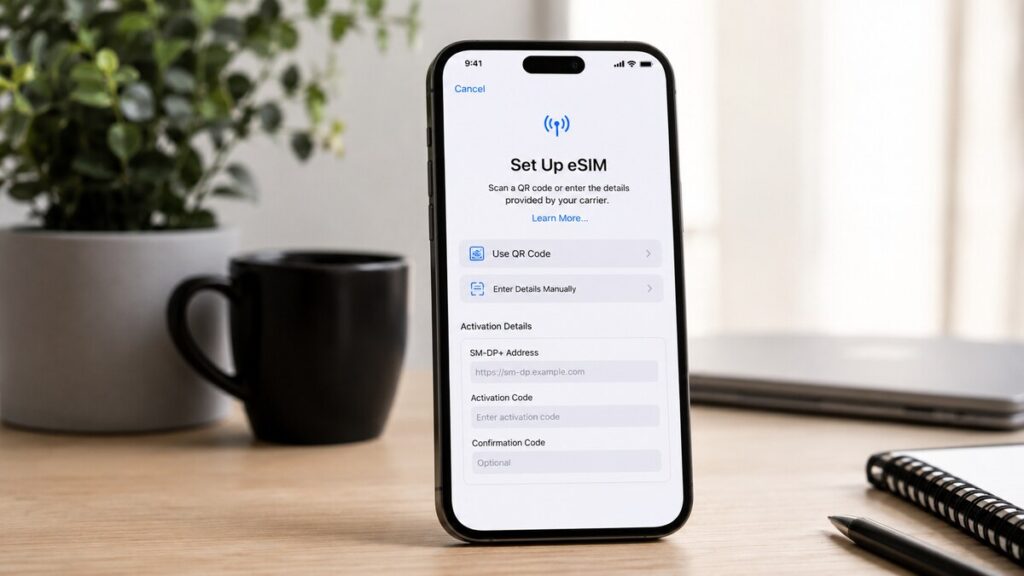
Setting up an eSIM is usually simple, but it can at times be challenging when your phone suddenly asks for technical details. One of the most common terms travellers encounter is SM-DP+ address, particularly during manual setup or when a QR code does not scan properly. For people who rely on Travel eSIMs, this can be a slightly worrying moment. The good news is that seeing this term does not automatically mean something has gone wrong. It usually means your phone needs extra setup information before the eSIM can be installed. Quick Answer An SM-DP+ (Subscription Manager Data Preparation) address is a unique server code your phone uses to find and download an eSIM profile from your eSIM provider. In other words, it tells your device where to collect the eSIM details from. Most travellers do not need to enter it manually if the QR code setup works. It usually becomes relevant when: The important thing to remember here is to never guess the SM-DP+ address. Use the details provided in your eSIM setup instructions or contact support. What This Means for Travellers For travellers, the SM-DP+ address is mostly a setup detail. It is not a password, a roaming charge, or a sign that your phone has been hacked. It is part of the process your phone may use to install an international eSIM. If you are using a data-only eSIM, the service is usually designed for mobile data rather than normal calls and SMS. That means the eSIM may help with maps, WhatsApp, email, banking apps, browser access, ride-share apps, and hotspot where supported, but it may not replace every function of your regular SIM. Before departure, it is worth checking how the eSIM should be installed, when it should be activated, and which mobile data settings are recommended. For more background before setup, this guide on how an eSIM works explains the basics in simple terms. SM-DP+ Address and eSIM Setup During eSIM setup, your phone needs to download the correct eSIM profile. That profile contains the details your device uses to connect to a mobile network in your destination. There are usually two setup paths. The first is QR code installation, where your phone scans the eSIM details automatically. The second is manual installation, where you may need to enter the SM-DP+ address and an activation code. If the QR code setup works, you may never see the SM-DP+ address. If manual setup is needed, follow the details exactly as provided. A small typo can stop the eSIM from installing. Step-by-Step Checklist for SM-DP+ Address Troubleshooting What Not to Do During Setup Do not delete the eSIM too early. Some eSIMs cannot be reinstalled once removed from the device, so only delete it if the instructions or support team advise you to. Do not keep rescanning the same QR code without checking the setup guide. Repeated attempts can create confusion, especially if the eSIM has already been added to the device. Do not ignore carrier-lock messages. If your phone is locked to your regular provider, the eSIM may not install or connect as expected. Do not assume emergency calls work the same way everywhere. Emergency service access can depend on your device, local networks, active SIM settings, and the country you are visiting. Keep a backup plan for urgent calls. Do not turn off your main SIM without checking what you still need it for. Banking codes, two-factor authentication, and SMS access may still rely on your regular number. Do not share your QR code, activation code, or eSIM setup details with anyone else. How TravelKon Users Should Prepare For TravelKon users, the setup email and product instructions should be treated as the main guide. Different eSIM products may have different installation timing, destination coverage, roaming settings, and hotspot support, so it is better to follow the exact instructions for the eSIM you purchased. Before departure, save your TravelKon installation email somewhere easy to access. It is also sensible to keep a screenshot of the setup instructions, but avoid sharing the QR code or activation details. Check that your device is eSIM-compatible and unlocked. Confirm that the product matches your destination and travel dates. Install using Wi-Fi, and read the product notes before changing roaming settings or mobile data settings. If you’ll need to use hotspot during your trip, check whether it is supported on your selected eSIM plan. This is especially useful if you plan to connect a laptop, tablet, or another traveller’s device. A few minutes of preparation before departure can prevent a stressful setup moment after airport arrival. When to Contact TravelKon Support Contact TravelKon support rather than guessing if: When asking for help, include screenshots of the error message, your device model, destination, order details, and the steps already tried. That gives our support team the best chance of identifying the issue quickly. Takeaways An SM-DP+ address is simply the server address your phone may use to download an eSIM profile during setup. Most travellers only see it when installing an eSIM manually or fixing a setup issue. The safest next step is to check your installation email, follow the product instructions, use stable Wi-Fi, and avoid deleting the eSIM too soon. For TravelKon users, the setup email and TravelKon support channels are the right places to turn if the phone asks for details that are not clear. FAQs What is an SM-DP+ Address on an eSIM? An SM-DP+ address is the server address your phone uses to download the correct eSIM profile from your provider. It is usually needed during manual eSIM setup. Why Is My Phone Asking for an SM-DP+ Address? Your phone may ask for an SM-DP+ address if the eSIM is being installed manually, if the QR code does not scan, or if the setup process needs extra activation details. Do I Need an SM-DP+ Address to Install a Travel eSIM? Not always. Many travel eSIMs can be installed by scanning a QR code. You may only

What Is an SM-DP+ Address? Read More »

iphone is carrier locked

What Does It Mean if My iPhone Is Carrier-Locked?

You are setting up mobile data, checking your travel apps, sorting maps and messages, then suddenly your iPhone shows a carrier lock setting that you’ve never seen before. If you are a traveller planning to use a Travel eSIM, this is one of the first checks worth doing before departure. A travel eSIM can be a simple way to stay connected overseas, but your iPhone still needs to be able to accept a mobile plan from another provider. The good news is that the check is quick. However, the downside is that if the phone is locked, the fix usually needs to come from your current mobile carrier, not from the eSIM provider. That is why it is better to find out at home than at the airport gate. Quick Answer A carrier-locked iPhone is an iPhone that is restricted to one mobile provider. As such, it may not accept a travel eSIM, international eSIM, local SIM card, or overseas mobile network from another provider until the carrier removes that restriction. This is not the same as your screen passcode, Face ID, Apple ID, or SIM PIN, but a mobile network restriction linked to the device. If your iPhone shows a carrier restriction, contact your mobile provider before relying on an eSIM for mobile data overseas. Carrier-Locked vs eSIM-Compatible A common mistake is assuming that eSIM support and carrier unlock status are the same thing. They are not. An iPhone can support eSIM and still be carrier-locked. That means the phone may have the technical ability to install an eSIM, but the carrier restriction may still stop another provider’s mobile plan from working. As such, the iPhone may allow you to start the eSIM setup process, but activation or connection can fail if the device is not allowed to use another network. There are three separate checks to make: If any one of these is wrong, your international eSIM may not work as expected. How to Check Your iPhone’s Carrier Lock Status To check whether your iPhone is unlocked, go to: Settings > General > About > Carrier Lock If your iPhone says No SIM restrictions, it is unlocked. On some devices or regional settings, the wording may refer to carrier, network provider, or SIM restrictions. The key message you want to see is No SIM restrictions. If the phone shows a carrier restriction instead, contact the mobile provider that supplied or locked the device. Only the carrier can usually unlock it, and it may take time, so this is best done before departure. What to Do Before Departure Before installing a TravelKon eSIM or any other data-only eSIM, run through this simple checklist. 1. Check the Carrier Lock Status Start with the carrier lock check first. If the phone is locked, sort that out before spending time on eSIM setup. Go to: Settings > General > About > Carrier Lock You want to see: No SIM restrictions If you do not see that, contact your carrier and ask whether the iPhone can be unlocked for international SIM or eSIM use. 2. Confirm Your iPhone Supports eSIM Once the phone is unlocked, check whether your iPhone model supports eSIM. This is a separate step from checking whether the phone is carrier-locked. If you are unsure, use our guide on how to check phone eSIM support before purchasing or installing a travel eSIM. 3. Read the eSIM Product Instructions Check the destination, data allowance, validity period, activation timing, and setup instructions. Some eSIMs activate when installed. Others activate when they first connect to a supported network overseas. This is important because installing too early, waiting too long, or deleting the eSIM after setup can create avoidable problems. 4. Install the eSIM on Stable Wi-Fi A strong Wi-Fi connection makes eSIM setup easier. Install the eSIM before departure where possible, unless the product instructions say otherwise. Once installed, do not delete it unless support tells you to. Many eSIMs cannot simply be reinstalled after removal. 5. Label Your SIM Lines Clearly Use simple labels such as: Clear labels help avoid using the wrong line for mobile data or turning on data roaming for the wrong SIM. 6. Set Mobile Data to the Travel eSIM When you are ready to use the plan, choose the travel eSIM as your mobile data line. This is especially important if your normal Australian SIM remains active for calls or messages. Your iPhone needs to know which line should handle mobile data overseas. 7. Check Data Roaming on the Right Line Many travel eSIMs require data roaming to be switched on for the eSIM line. That does not mean roaming should be turned on for every SIM. Check the product instructions, then make sure roaming settings are applied to the travel eSIM, not accidentally to your regular Australian mobile plan. 8. Test the Connection After Arrival When you arrive, turn off flight mode, wait a few minutes, and check whether your iPhone connects to a local network. If nothing happens, restart the phone. Then check the mobile data line, data roaming setting, and any APN or app setup instructions provided with your eSIM. What to Do if You Are Already Overseas If you are already overseas and your eSIM is not working, start with the same three-part check. First, check the carrier lock status. If the iPhone is locked, contact your Australian mobile provider. Some carriers may be able to help remotely, but this depends on the carrier, account status, and their unlocking process. Second, check whether the eSIM is installed. If it is installed, do not delete it while troubleshooting unless support asks you to. Take screenshots of the settings first. Third, check your mobile data settings. Make sure the travel eSIM is selected for mobile data and that data roaming is switched on for that eSIM line if the product requires it. If the eSIM is installed, the phone is unlocked, and the settings look correct, contact TravelKon support with screenshots and trip details

What Does It Mean if My iPhone Is Carrier-Locked? Read More »

what is an imei number

What Is an IMEI Number and Why Is It Important?

An IMEI number is one of those small phone details that can suddenly become important when setting up mobile data overseas, checking eSIM compatibility, or trying to fix a connection issue after landing. If you’ve been using Travel eSIMs, then you must be aware that the IMEI number can help confirm the device being used, support carrier lock checks, and make troubleshooting much easier if the eSIM setup does not go as planned. It is not something most people think about before departure, but it is worth checking before relying on airport Wi-Fi, hotel reception, or a roaming bill that nobody wanted. So, What Is an IMEI Number? An IMEI (International Mobile Equipment Identity) number is a unique 15-digit code used to identify your specific mobile device. Most phones have one IMEI, while dual SIM devices may show two. In plain terms, the IMEI identifies the physical device on a mobile network. It is not the same as a phone number, SIM card number, eSIM QR code, activation code, or mobile plan. For travel eSIM users, the IMEI is useful because it can help with compatibility checks, carrier lock questions, device identification, and support troubleshooting before or during travel. The key point is that having an IMEI number does not automatically mean the phone supports eSIM. A phone also needs to be eSIM-compatible and unlocked for a TravelKon eSIM or other international eSIM to work properly. How to Find Your IMEI Number The fastest way to find an IMEI number on most phones is to dial: *#06# The IMEI should appear on screen. As mentioned earlier, some devices may show IMEI 1 and IMEI 2. It can usually also be found in the phone settings. On iPhone, check the About section in Settings. On Android, check the About Phone or Status section. The wording may vary depending on the model and software version. If the original box is still available, the IMEI may also be printed on the label. Remember to be careful with your IMEI number. It is a device identifier, so only share it through official support channels when needed. Step-By-Step Checklist Before Using a Travel eSIM A few simple checks before leaving Australia can prevent a lot of stress later. Work through these before departure, then come back to them after landing if the connection needs troubleshooting. 1. Check that the Device Supports eSIM Not every phone supports eSIM, even if it is a newer model. Check the device model against the TravelKon eSIM product instructions before buying or installing. Also, check whether the device has an EID in the settings. An EID usually indicates eSIM capability, while an IMEI alone does not confirm it. 2. Confirm the Phone Is Unlocked A carrier-locked phone may not accept an international eSIM. This is separate from the IMEI itself, but the IMEI may be useful when asking the original carrier to check whether the device is unlocked. This is important, particularly for phones bought through a mobile provider or as part of a plan. 3. Save the IMEI Before Departure Keep the IMEI somewhere safe before travelling. Do not post it publicly or send it through unofficial channels, but having it available can help if support needs to confirm device details. For dual SIM phones, save both IMEI numbers if both are shown. 4. Follow the eSIM Setup Instructions Carefully Install the TravelKon eSIM using the instructions provided with the product. Some eSIMs may be installed before departure, while others may activate once connected to a supported network overseas. Avoid guessing during setup. eSIM setup can vary by destination, device, product type, and activation method. 5. Select the Correct Mobile Data Line Once the eSIM is installed, choose it as the mobile data line. This is easy to miss when the physical SIM is still active in the phone. For a data-only eSIM, calls and SMS may still sit with the primary SIM, while mobile data runs through the travel eSIM. 6. Check Roaming Settings on the Right SIM Many travel eSIM products require data roaming to be turned on for the eSIM line. That does not mean roaming should automatically be turned on for the home SIM. Check each SIM line separately. Keep the home SIM controlled if avoiding roaming charges, and apply the required roaming settings to the TravelKon eSIM line according to the product instructions. 7. Test the Connection After Arrival After landing, give the phone a few minutes to connect. If needed, toggle aeroplane mode on and off, check the selected data line, and confirm the eSIM is switched on. If hotspot use is important, check whether the selected eSIM product, destination, device, and local network support hotspot before relying on it. Common Mistakes to Avoid Assuming IMEI means eSIM-ready. An IMEI identifies the phone, but it does not confirm eSIM support. The device still needs to be compatible with eSIM. Using a carrier-locked phone. A locked phone may reject an international eSIM or fail to connect properly. Check this before departure. Leaving mobile data on the home SIM. The eSIM may be installed correctly, but the phone can still use the wrong line for mobile data. Turning roaming on for the wrong SIM. If roaming is required, it usually needs to be enabled on the travel eSIM line, not the home SIM. Deleting the eSIM too quickly. If the connection is not working, check the setup instructions first. Removing the eSIM can make troubleshooting harder, and some eSIMs may not reinstall in the same way. Waiting until the last minute. The airport gate is not the ideal place to check device compatibility, carrier lock status, roaming settings, app setup, and product instructions. When to Contact TravelKon Support Contact our team if the device appears compatible, the eSIM has been installed using the product instructions, and the connection still is not working as expected. Before reaching out, collect the details that make troubleshooting easier: Only share these details through official TravelKon support channels. Avoid

What Is an IMEI Number and Why Is It Important? Read More »

ekyc and esims

What Is eKYC and Why Do Some eSIMs Require It?

It is quite common for travellers who are ready to set up mobile data overseas to find an identity check sitting between purchase and connection. For anyone comparing Travel eSIMs, this step can feel unexpected. One plan may activate with a simple QR code, while another may ask for a passport scan, selfie, or app verification before the service can be used. That difference usually comes down to local mobile rules, provider requirements, and how the specific eSIM product is issued. Once the process is understood, it becomes much easier to prepare before departure and avoid setup stress after landing. Quick Answer eKYC stands for electronic Know Your Customer and is a digital identity verification process used to confirm that a customer is a real person before certain mobile services are activated. Some travel eSIM, international eSIM, and local mobile products require eKYC because the destination country or network provider may require customer identity checks before allowing access to mobile data overseas. Not every TravelKon eSIM requires eKYC. Requirements can vary by country, product, network, and activation process. The safest approach is to check the product instructions before departure, confirm device compatibility, and complete any required verification while you still have reliable internet access. What eKYC Means in Simple Terms eKYC is the online version of showing ID at a phone shop. Instead of presenting a passport at a counter, the process may ask you to upload a passport image, scan an identity document, take a selfie, or confirm personal details through an app. The system then checks those details before the mobile service can be approved. For travellers, this can happen at different points. Some eSIMs ask for verification during purchase. Others may ask after purchase, during app setup, or before the eSIM starts working on the destination network. This is why installing an eSIM and activating the service are not always the same thing. The eSIM profile may be on the phone, but mobile data may not work until the required verification has been completed. Why Some eSIMs Require Identity Verification The main reason is regulation. Some countries require mobile providers to register customers before allowing access to local mobile networks. This can apply to physical SIM cards, prepaid SIM cards, travel SIMs, and eSIMs. There are also provider-level checks. eKYC can help reduce fraud, support local compliance processes, and confirm that the service is being issued to a real person. That does not mean every international eSIM will require identity verification. A regional data-only eSIM may have a simple setup process, while a country-specific eSIM in a stricter market may require extra steps. The requirement is usually linked to the destination, the network partner, or the product setup process rather than being a traveller’s personal choice. TravelKon eSIM Setup and eKYC A TravelKon eSIM may use QR-code setup, app-based setup, or destination-specific activation steps. If eKYC is required, treat it as part of the eSIM setup rather than a separate problem. Before buying or installing our travel eSIMs, check the product instructions for activation timing, device compatibility, roaming settings, hotspot availability, and any identity verification requirements. This is especially important before departure. Airport Wi-Fi, low battery, passport queues, and tired eyes are not ideal conditions for troubleshooting an app or scanning a passport photo. A few minutes of preparation at home can make arrival much smoother. Step-by-Step eKYC and eSIM Setup Checklist 1. Check whether eKYC Is Required Before purchase or installation, look for any mention of identity verification, passport checks, app verification, or customer registration. If the instructions mention eKYC, do not leave it until the last moment. 2. Confirm When Verification Must Be Completed Some products may require eKYC before installation. Others may require it before activation or before the eSIM connects overseas. Check whether the verification step must be completed before departure, after purchase, or once you arrive. 3. Confirm Your Phone Supports eSIM Your phone must support eSIM and be unlocked for use with other mobile providers. If the device is not compatible, the eSIM setup will not work properly, even if the identity check is successful. 4. Keep Your Passport Ready For international travel products, a passport is often the most useful ID document. Make sure the photo page is clear, readable, and easy to scan in good lighting. 5. Complete App Setup Before Departure If the eSIM uses app setup, create the account and complete any required verification while you still have stable internet access. This reduces the risk of being stuck after landing with no working data connection. 6. Install the eSIM Carefully Follow the QR code or manual installation steps exactly. Give the eSIM a clear label, such as “Travel Data” or the destination name, so it is easy to identify in your phone settings. 7. Select the Travel eSIM for Mobile Data Once ready to use the service, choose the travel eSIM as the mobile data line. If your home SIM is still active for calls or SMS, check that it is not being used for data roaming by mistake. 8. Turn On Data Roaming For The Correct eSIM Many travel eSIMs require data roaming to be enabled on the eSIM line. This does not mean your home SIM should also have roaming switched on. Check the settings carefully before using mobile data overseas. 9. Test The Connection After Arrival After landing, turn off aeroplane mode, select the eSIM for mobile data, enable roaming for that eSIM if required, and wait a few minutes. If it does not connect, restart the phone and recheck the setup instructions before deleting anything. Common Mistakes To Avoid Never assume that every eSIM activates the same way. A simple QR-code setup on one trip does not mean the next destination will have the same process. Do not ignore eKYC instructions until arrival. Verification is often simple, but delays can happen if the passport image is blurry, the selfie check fails, or the app needs a stronger connection. And as always, do

What Is eKYC and Why Do Some eSIMs Require It? Read More »

pdp authentication failure

What Is PDP Authentication Failure and How to Fix It

A PDP authentication failure usually appears at the worst possible time. Often, after you’ve just landed and your phone was in flight mode or when turning on a Travel eSIM plan for the first time. For travellers, this error can feel more serious than it often is, resulting in anxiety. The good news is that it is often caused by settings, not a failed eSIM. A few small details can stop mobile data from working properly, and we’re going to look at them and how you can fix each issue. The Short Answer PDP authentication failure means the phone cannot complete its mobile data connection with the network. With a travel eSIM, this is commonly linked to the wrong mobile data line being selected, data roaming being turned off, incorrect APN settings, a weak local network connection, or the eSIM not being active for that destination yet. Start with the basics like selecting the eSIM for mobile data, turning on data roaming for that eSIM, restarting the phone, checking the APN, and only then move to manual network selection or network reset. Avoid deleting the eSIM unless support specifically tells you to. What PDP Authentication Failure Means PDP stands for Packet Data Protocol. In simple terms, it is part of the process your phone uses to start a mobile data session. When everything works properly, the phone connects to the local network, checks the data settings, confirms the plan can use data, and opens the connection. When a PDP authentication failure appears, it means that the process has failed. Think of it like arriving at a hotel with a booking, but the front desk cannot match one of the details. The booking may exist, but one mismatch is stopping the check-in. With an international eSIM, the issue often sits in the eSIM profile, selected mobile data line, roaming settings, APN settings, or local partner network. Step-By-Step Checklist to Fix PDP Authentication Failure Work through these checks in order. Most mobile data overseas issues come down to one missed setting. First Checks Confirm the eSIM is installed on your iPhone. Go to your mobile or cellular settings and check that the eSIM profile appears. If it is not visible, the eSIM has not been installed correctly. Next, make sure the travel eSIM is selected for mobile data. If your normal Australian SIM is still selected, the phone may be trying to use the wrong plan. Go to: Settings > Mobile or Cellular > Mobile Data Then select the travel eSIM as the line for mobile data. If you are using dual SIM, your everyday SIM can usually stay active for calls or texts, but mobile data should be assigned to the eSIM you want to use overseas. Roaming Settings Turn on data roaming for the travel eSIM. Go to: Settings > Mobile or Cellular > select the eSIM > Mobile Data Options > Data Roaming Travel eSIMs often need data roaming switched on because they connect through partner networks in the destination country. This does not mean your Australian SIM should also have roaming turned on. Keep the settings separate. To avoid home carrier roaming charges, make sure your Australian SIM is not selected for mobile data. Restart and Refresh the Connection Restart the iPhone. This forces the device to refresh its network connection and can clear a stuck mobile data session after landing. After restarting, give the phone a few minutes to reconnect. Do not keep changing settings every few seconds, as the device may need time to register on the local network. If the issue continues, toggle Flight Mode on for around 30 seconds, then turn it off again. Once the signal returns, test mobile data with Wi-Fi switched off. Use a basic webpage or maps search for testing. Some apps may show cached content, which can make it harder to tell whether mobile data is actually working. APN Settings Check the APN details in your eSIM setup instructions. APN stands for Access Point Name, and it tells the phone how to connect to the provider’s data service. Some eSIMs set this automatically, while others need the APN entered manually. If an APN is provided, enter it exactly as shown. And if the instructions say to leave it blank, leave it blank. Do not guess or copy APN details from another provider. Network Selection If automatic network selection is not working, try choosing a network manually. Go to: Settings > Mobile or Cellular > Network Selection Turn off Automatic, wait for available networks to appear, then choose a supported network if your eSIM instructions list one. If one network does not work, try another available partner network. Once the connection is working, automatic selection can usually be turned back on unless the provider recommends staying on a specific network. App, VPN, and Plan Checks Turn off any VPN, private relay, security filter, or work profile while testing. These can interfere with connection checks. Also, confirm the plan is valid for your destination, has not expired, and still has data available. A regional international eSIM may cover several countries, but not every nearby country is automatically included. Check your order email, product page, or app setup instructions before assuming the plan should work in a particular country. Last-Resort is Network Reset If the easier checks do not work, reset network settings. On iPhone, this is usually found under: Settings > General > Transfer or Reset iPhone > Reset > Reset Network Settings This clears saved Wi-Fi networks and network-related settings, so it should not be the first step. Avoid any reset option that removes eSIMs unless support has told you to use it. Common Mistakes to Avoid The biggest mistake is deleting the eSIM too early. It feels like a clean restart, but many eSIMs are designed for one installation. Once removed, they may need provider support or may not be reusable. Another common issue is turning on data roaming for the wrong SIM. If your Australian SIM has

What Is PDP Authentication Failure and How to Fix It Read More »

how to make a phone call with data only esim

How to Make a Phone Call With a Data-Only eSIM

How do you make a phone call with a data-only eSIM? This is one of those questions that tends to appear when bags are packed, airport coffee is in hand, and one last thought about whether normal calls will still work overseas. For any traveller using a Travel eSIM, the answer depends on the type of call being made. A WhatsApp call is not the same as calling from the normal phone dial pad. FaceTime Audio, Messenger and similar apps also work differently from a standard mobile call. And that difference determines a lot, as you are about to find out. Quick Answer Yes, you can make a phone call with a data-only eSIM, but it will normally be through an internet calling app rather than the phone’s standard dial pad. A data-only eSIM gives your phone mobile data overseas. That means apps such as WhatsApp, FaceTime Audio, Messenger, Skype, Viber and WeChat can use that data connection for calls, provided the app is already set up and the eSIM is connected. What it usually does not provide is a new phone number for regular mobile calls and SMS. Some travel SIM or international eSIM products may include local calls or texts, but this depends on the exact plan. Check the product details before departure if standard calling, SMS verification or emergency calling matters for your trip. What a Data-Only eSIM Means A data-only eSIM, as the name suggests, is built for internet access. It is best thought of as a travel data connection, not a full replacement for your usual mobile service. Once active, it can power the apps that need internet access. That includes Google Maps, WhatsApp, FaceTime Audio, Messenger, email, web browsing, banking apps, rideshare apps and translation tools. If an app works over mobile data or Wi-Fi at home, it will usually work over travel eSIM data overseas. The confusion usually comes when you start thinking about making calls. A standard phone call uses a mobile network voice service and normally needs a phone number. This is the type of call made from the phone’s regular dial pad. An app-based call uses the internet. WhatsApp calls, FaceTime Audio calls and Messenger calls sit in this category. These calls do not need the travel eSIM to have its own phone number, but they do need working mobile data or Wi-Fi. That is the key point. A data-only eSIM can help you call people through apps, but it may not let you dial a standard number unless the plan includes calls. How to Make Calls on Different Apps With a Data-Only eSIM The simplest way to make a phone call with a data-only eSIM is to use an app that calls over the internet. Before travelling, open the apps you plan to use and make sure they are already logged in. WhatsApp, FaceTime, Messenger and similar apps can become frustrating if they ask for SMS verification after your home SIM is switched off, out of service or unable to receive messages overseas. For WhatsApp, keep your existing number active in the app. There is usually no need to change your WhatsApp number just because you are using an international eSIM for data. Once the TravelKon eSIM is connected to mobile data, WhatsApp can use that connection for messages and calls. For FaceTime Audio, check that FaceTime is enabled and allowed to use mobile data. This is especially important on iPhone, where one small setting can stop the app from using your travel data connection. For Messenger, make sure the app is updated, logged in and allowed to use mobile data. Messenger calls can work over mobile data, but they will use part of your data allowance. Wi-Fi Calling is different again. It depends on your home mobile carrier, device, plan and settings. Some Australian providers support Wi-Fi Calling overseas, while others may have limits or conditions. Set it up and test it before leaving Australia, then check any costs or restrictions with your mobile provider. What to Do Before You Leave for Your Trip Start by confirming that your phone is unlocked and eSIM compatible. Some older devices do not support eSIM, and some models vary by region. Install your eSIM using the instructions provided with your TravelKon eSIM. Keep Wi-Fi available during installation, as the first setup step usually needs an internet connection. Give your SIMs clear names. For example, label your home SIM as “Australia” and your travel eSIM as “TravelKon” or the destination name. This makes it easier to choose the right SIM for mobile data, calls and messages. Set mobile data to the travel eSIM. On iPhone, this is usually under Mobile or Cellular settings. On Android, look for SIM manager, mobile network or preferred SIM for mobile data. Turn data roaming on for the travel eSIM if the product instructions say it is required. Many travel eSIMs need roaming enabled to connect to the correct overseas network. Decide what to do with your home SIM. If avoiding roaming charges is the goal, turn off data roaming for the home SIM. If SMS codes are still needed, the home SIM may need to stay active, but any costs depend on your Australian carrier. Open WhatsApp, FaceTime Audio, Messenger or your preferred calling app before departure. Make a quick test call while still in Australia, so there are no login surprises later. Save important contacts inside your calling apps, not just in your phone contacts. Hotels, drivers, tour operators and restaurants often use WhatsApp, which can be easier than placing a standard international call. Do This After You Land Switch mobile data to your TravelKon eSIM and follow the product instructions. Some eSIMs connect automatically, while others may need manual network selection or APN settings. Check that your phone shows signal bars and a data symbol such as 4G, 5G or LTE. Then open a browser and load a simple webpage. This confirms that mobile data is working before troubleshooting individual apps. If WhatsApp

How to Make a Phone Call With a Data-Only eSIM Read More »

how to use uber with an esim

How to Use Uber With an eSIM

Landing overseas comes with a few small but important jobs, such as finding your luggage, checking your hotel address, working out the airport exit, and getting transport without wasting time. For many Australian travellers, Uber is the easiest option, particularly after a long flight. A Travel eSIM can make that first arrival feel much less stressful by giving your phone mobile data once you are away from airport Wi-Fi. That can be super helpful when rideshare pickup zones are busy, maps need to load, and your driver is trying to find you. Can You Use Uber With an eSIM? Yes, Uber can work with an eSIM as long as your phone has working mobile data and your Uber account is already set up. Uber needs an internet connection for booking rides, loading maps, confirming payment, receiving trip updates, messaging drivers, and tracking your journey. A data-only eSIM can provide that connection overseas, even though it usually does not include a local phone number. The possible issue is verification. If Uber asks for an SMS code while you are overseas, that message may go to the phone number already linked to your account. A data-only eSIM may not receive that text, so it is best to log in and check your account before you fly. How to Set Up Uber Before You Travel Using Uber with an eSIM is very easy. Simply, open the Uber app and make sure you are logged in. If you have not used it for a while, update the app and check that your account details are current. Your mobile number and email address should be correct, as they may be used for account recovery or verification. Next, review your payment methods. Remove expired cards, add a backup card if needed, and make sure your default payment option can be used overseas. Payment problems are annoying anywhere, but they are much worse when you are standing in an airport arrivals area with luggage and a low phone battery. Save your first accommodation address before you travel. Hotel names can sometimes point to the wrong entrance, especially in large cities, resorts, or areas with several buildings under similar names. Having the full street address ready makes booking quicker and reduces the chance of choosing the wrong destination. Also, check app permissions. Uber works best when location services, notifications, and mobile data are enabled. Notifications are useful if the driver changes position, sends a message, or arrives sooner than expected. Using a Data-Only eSIM With Rideshare Apps A data-only eSIM gives your phone internet access overseas. That connection allows Uber to load maps, send booking requests, show driver updates, and keep the trip active in the app. The eSIM does not usually replace the phone number connected to your Uber account. Your Uber profile may still use your Australian mobile number, even while your phone uses an international eSIM for mobile data. That is normal. Where travellers can run into trouble is with account verification. If Uber logs you out, detects a new device, or asks for a one-time password by SMS, the code may be sent to your usual Australian number. If your home SIM is turned off, removed, or unable to receive SMS overseas, the code may not arrive. A simple approach is to log in before leaving Australia, keep your account details up to date, and avoid signing out while travelling. If this is your first time using an eSIM, it is also worth understanding how international eSIMs work before your trip. Airport Arrival Checklist Airport arrivals are where mobile data matters most because Wi-Fi can be unreliable once you leave the terminal. Plus, many airports have separate rideshare areas away from the main taxi rank. Before booking your ride, run through these checks:  Pickup zones can be confusing. Some airports use numbered doors, car park levels, terminal zones, or specific rideshare bays. A few extra seconds checking the pickup point can save several minutes of walking in the wrong direction. Troubleshooting Uber With an eSIM Most Uber problems overseas come down to login, payment, mobile signal, or pickup location. Here is how to handle the common ones. Uber Will Not Load Check that your eSIM is connected to mobile data. Turn flight mode on and off, confirm the eSIM is selected for data, and check the roaming setting for that eSIM. If your phone is connected to weak airport Wi-Fi, switch Wi-Fi off and try mobile data only. Phones often stay connected to poor Wi-Fi even when mobile data would work better. The SMS Code Will Not Arrive Uber may send a verification code to the phone number already linked to your account. A data-only eSIM usually will not receive SMS. If you need to receive texts on your Australian number, your regular SIM may need to stay active for SMS while the eSIM handles mobile data. Check this with your mobile provider before travelling, as international roaming settings and charges vary. Payment Failed Try another saved card or digital wallet if available. It is also worth checking whether your bank has blocked the transaction because it appears unusual or international. This is why a backup payment method is useful before departure. Fixing payment settings is much easier at home than at a crowded airport pickup zone. The Driver Is in the Wrong Place Before cancelling, check the airport pickup instructions inside the app. The map pin may look close while actually being on another road level, across a car park, or outside a different terminal. Send the driver a simple message with your exact location, such as “Terminal 1 rideshare zone, bay B” or “outside Door 4 near the taxi signs”. The Signal Is Weak Move away from basement arrivals areas, thick concrete walls, or crowded indoor spaces. Airports and train stations can have patchy signal in certain spots. If needed, use airport Wi-Fi to place the booking, then keep the app open while moving to the pickup area. This is not

How to Use Uber With an eSIM Read More »

how to use lyft with an esim

How to Use Lyft With an eSIM

Landing after a long flight is never the best time to sort out app logins, payment errors, or patchy airport Wi-Fi. For Australian travellers heading to the US or Canada, the right Travel eSIM can make that first rideshare booking much easier by keeping mobile data available once airport Wi-Fi drops away. That does not change when using Lyft. The app relies on an internet connection for maps, pickup points, driver messages, payment screens, and trip tracking. The part that catches some travellers out is account verification. A data-only eSIM can give your phone mobile data overseas, but it does not always replace the phone number linked to your Lyft account. Can You Use Lyft With a Travel eSIM? Yes, Lyft can work with a travel eSIM if your phone has working mobile data and your Lyft account is already set up correctly. The eSIM provides the internet connection. Lyft uses that connection to load the map, confirm your pickup point, request the ride, show driver details, send in-app messages, and track the trip. The main thing to remember is that a data-only eSIM usually does not receive SMS for your Australian number. If Lyft asks you to verify your account by text message, you may still need access to your regular SIM or another recovery option. So the safest approach is to set up Lyft before you travel, stay logged in, and use the eSIM for mobile data once you arrive. How to Set Up Lyft Before You Travel To use Lyft with a TravelKon eSIM, begin by updating the Lyft app if it is out of date. Then log in and make sure the account opens normally. If the app asks for verification, it is far easier to handle that before departure than at a busy airport pickup zone. Next, check your payment method. Make sure your card is current, accepted, and suitable for overseas transactions. Adding a backup card is a smart move if the app allows it. A declined card after landing can turn a simple ride into an annoying delay. It also helps to save your first destination. Add your hotel, apartment, or meeting location to your maps app or notes. That way, you are not searching through emails while standing outside arrivals. Before departure, check: The less your phone has to sort out after landing, the smoother that first ride tends to be. Using a Data-Only eSIM With Rideshare Apps A data-only eSIM gives your phone internet access overseas. However, it usually does not give you a new local phone number for standard calls or SMS. For Lyft, that means the eSIM can support the app’s main functions, while your account remains linked to your existing number, email, and payment details. In normal use, that works well. The app simply needs internet access to operate. The possible issue is verification. If Lyft asks for an SMS code, that code normally goes to the phone number already attached to your account. A data-only eSIM will not usually receive it. That does not mean you need a local US number. It just means your account should be ready before you fly, and your regular SIM should remain available if you think a text code may be needed. For a clearer breakdown of the connection side, our blog on how international eSIMs work is a useful read before setting up your phone. How to Use Lyft With an eSIM After You Land Once you land, turn on your eSIM and set it as the line for mobile data. If the eSIM instructions say data roaming must be enabled, switch it on for the eSIM line only. Keep an eye on your Australian SIM settings. Unless you intend to use your home provider’s roaming, avoid letting your regular SIM handle mobile data overseas. Before opening Lyft, test the connection. Open your maps app and check whether your location loads. If maps are working, Lyft is more likely to load properly too. Then open Lyft, enter your destination, and check the pickup options. Airports often have dedicated rideshare pickup zones, which may be on a different level or outside the main arrivals area. Follow the app instructions and airport signs rather than guessing from the closest exit. Do not request the ride too early. Wait until you have your bags and are close to the pickup area. That gives the driver a better chance of finding you and avoids rushed messages while still walking through the terminal. A good arrival flow looks like this: Airport Arrival Checklist Airport arrivals are where mobile data overseas becomes genuinely useful. Wi-Fi may work near baggage claim, then disappear near the rideshare area. With a TravelKon eSIM, you can keep using maps, messages, and ride tracking while moving through the airport. Before booking your Lyft, check that: Once matched with a driver, check the vehicle details carefully. Busy airports often have several rideshare cars arriving at once, so match the name, car model, and number plate before getting in. Troubleshooting Lyft With a Travel eSIM Most Lyft issues overseas come down to login, SMS verification, payment, signal, or pickup location. App Login Issues If Lyft asks you to log in again after landing, check whether your normal number can receive SMS before changing account settings. Repeated failed attempts can make the situation more frustrating. This is why staying logged in before travel is helpful. If the app works before departure, there is less to fix once you arrive. SMS Verification Problems A data-only eSIM usually cannot receive SMS for your Australian number. If Lyft sends a code to that number, it will normally go to your regular SIM. Keep your usual SIM available where possible. You may not need it for mobile data, but it can still help with app logins, banking checks, and travel bookings. Payment Failures If the ride request fails at payment, try another saved card if one is available. Also check whether your bank has blocked the transaction

How to Use Lyft With an eSIM Read More »

how to use bolt with an esim

How to Use Bolt With an eSIM

That first airport ride can feel simple until the terminal Wi-Fi drops, the pickup bay is outside, and the driver is asking where you are while your luggage is still in one hand. If you are an overseas traveller, Travel eSIMs can make that moment much easier by keeping mobile data available once airport Wi-Fi stops being useful. That connection can particularly come in handy when opening Bolt, loading maps, choosing the right pickup point, messaging the driver, and tracking the trip to your accommodation. Quick Answer Bolt can work with a travel eSIM when your phone has active mobile data, and your Bolt account is already set up. The eSIM supplies the internet connection, while the Bolt account may still be linked to your existing phone number. That distinction is important. A data-only eSIM helps with maps, booking, driver messages, notifications, payment confirmation, and trip tracking. However, it may not receive SMS codes.  How to Set Up Bolt Before You Travel To use Bolt with an eSIM, start by installing or updating Bolt. Open the app, log in, and make sure your account is active. If Bolt asks for a phone number, email check, passcode, or SMS verification, complete it before the trip. Next, check your payment method. Add the card you plan to use overseas, remove expired cards, and keep a backup card available if possible. It is also worth checking your bank app for travel settings, because some banks may flag overseas payments as unusual. Then check the practical app settings. Bolt should have location access, notifications, and mobile data enabled. Save your hotel, apartment, or first destination in Bolt or your maps app. Taking a screenshot of the address and booking details is also useful in case the app, Wi-Fi, or mobile data takes a moment to load after landing. Using a Data-Only eSIM With Rideshare Apps A data-only eSIM gives your phone internet access overseas. It does not usually replace your normal mobile number. For Bolt, that usually works well once the account is ready. The app needs mobile data for live trip functions such as loading the map, finding nearby drivers, confirming the ride, sending messages, receiving alerts, and following the route. Your account, however, may still depend on the phone number used when it was created. As such, the eSIM can provide data, but if Bolt asks for an SMS code after arrival, that code may still go to your Australian number. Depending on your mobile provider and phone setup, you may need access to your primary SIM, roaming for SMS, or another verification option shown in the app. For a clearer breakdown of how eSIMs connect overseas, our guide to how international eSIMs work is a helpful companion before you fly. How to Use Bolt With an eSIM Overseas Once your eSIM is installed and active, using Bolt should feel much like using it at home. The key is making sure your phone is actually using the eSIM for mobile data. Before opening Bolt, check your mobile data settings. The travel eSIM should be selected as the data line. If the eSIM instructions say data roaming is required, turn roaming on for that eSIM only. Be careful with roaming on your Australian SIM unless you understand the charges. Open Bolt once your data connection is working. Enter your destination, then check the pickup point carefully before confirming. Airports often have dedicated rideshare areas, and the closest road on the map is not always the correct place to meet the driver. After booking, keep an eye on driver messages and movement in the app. If the driver asks where you are, give simple details like terminal, door number, pickup bay, car park level, or a nearby sign. Clear pickup messages can save a lot of walking around, especially after a long flight. Airport Arrival Checklist Airport Wi-Fi can help inside the terminal, but mobile data is more reliable once you move towards baggage claim, exits, car parks, or rideshare pickup areas. Before booking Bolt, check the following: A quick maps check can also help. Open your Maps app and see whether your location is showing correctly. If Maps cannot find you, Bolt may also struggle to place the pickup pin accurately. Troubleshooting Bolt with an eSIM App Login Issues If Bolt logs you out overseas, first check whether your eSIM data is actually working. Open a webpage or the Maps app. If nothing loads, the issue is likely the mobile connection rather than Bolt. Try switching between airport Wi-Fi and mobile data. If the app works on Wi-Fi but not mobile data, check that the eSIM is selected for data and roaming is set correctly. If the app works on mobile data but not airport Wi-Fi, the Wi-Fi network may be slow, overloaded, or restricted. SMS Verification Problems A data-only eSIM may not receive SMS. If Bolt sends a code to your Australian number, you may need to access your regular SIM or enable SMS roaming through your primary mobile provider. Check any roaming costs first. This is the main reason to complete app setup before travel. Once Bolt is already logged in, you are less likely to deal with verification during the airport pickup rush. Payment Failures If payment fails, try another saved card. Also, check whether your bank has blocked the transaction. Some travellers keep a backup card in the app and a small amount of local cash available, just in case another transport option is needed. Avoid waiting until the driver arrives to fix payment issues. A quick payment check before confirming the ride can prevent a cancelled booking. Weak Signal Underground arrivals areas, airport car parks, thick terminal walls, and crowded pickup zones can all affect signal. Move closer to an open area if the app is struggling to load or the driver’s location is not updating. Toggling flight mode on and off can sometimes help the phone reconnect to the local network. If your eSIM supports more

How to Use Bolt With an eSIM Read More »

how to check data usage on iphone

How to Check Your Data Usage on iPhone

How to check your data usage on iPhone is a practical question that matters most when travel data becomes limited, paid for upfront, or tied to a specific eSIM plan. It is one thing to use mobile data at home without thinking too much about it. But it is another thing entirely when maps, rideshare apps, hotel bookings, WhatsApp, email, and hotspot are all relying on the same travel data allowance. For Australian travellers using Travel eSIMs, checking iPhone data usage can help confirm whether the right mobile plan is being used overseas. It can also help spot apps that are using data in the background before they take a bigger bite out of the allowance. The main thing is knowing where to look, what the numbers actually mean, and which settings are most important when using an international eSIM. Quick Answer To check data usage on iPhone, go to Settings > Mobile Data or Settings > Cellular, then scroll down to view your usage for the current period and by individual app. Depending on your iPhone region and iOS version, the wording may say Mobile Data or Cellular. Both lead to the same general area. You can usually check: However, you should keep in mind that the iPhone’s Current Period does not always reset automatically at the start of a trip, billing cycle or eSIM plan. It only shows usage since the last manual reset. For travel, resetting statistics before departure makes the numbers much easier to trust. Also, iPhone data usage should be treated as a device-side guide. It is helpful for monitoring habits, but it may not always match the provider’s live usage records exactly. What Data Usage Means on iPhone Data usage is the amount of mobile data your iPhone has used through a SIM or eSIM. This includes browsing, messaging apps, emails, maps, social media, cloud backups, streaming, app updates and hotspot use. When travelling, the setup can become slightly more confusing because an iPhone may have more than one mobile plan installed on it. A regular Australian SIM may still be active for calls or SMS, while a TravelKon eSIM may be used as a data-only eSIM for mobile data overseas. That is why checking usage is not only about the total number of gigabytes used. You also need to check which line is using the data. If the wrong SIM is selected for mobile data, the travel eSIM may be installed correctly, but not actually do anything. If roaming settings are wrong, the eSIM may not connect properly. If a background app is active, data may disappear faster than expected, even when the phone is sitting in a pocket. How to Check Your Data Usage on iPhone Before or During Travel As previously stated, start with the general iPhone settings. These checks apply whether you are using a physical SIM, a local SIM, or an international eSIM. 1. Open Mobile Data Settings Go to: Settings > Mobile Data Or, depending on your iPhone: Settings > Cellular This is where your iPhone shows mobile plans, app data usage, roaming usage and mobile data controls. 2. Check Current Period Usage Scroll down until you see Current Period. The numbers you’ll see here show how much mobile data has been used since the last time the statistics were reset. If it has not been reset for months, the number may include old data from home, work, previous trips or other SIMs. Before travelling, scroll to the bottom of the page and tap Reset Statistics. Doing this just before departure, or just before switching to the travel eSIM, gives you a cleaner view of trip usage. 3. Check Per-App Data Usage On the same screen, scroll through the app list. Each app shows how much mobile data it has used during the current period. This is often the most useful part of the screen. It quickly shows whether data is being used by expected apps like Maps and WhatsApp, or by heavier apps like Instagram, TikTok, YouTube, cloud storage, or email attachments. If an app does not need mobile data while travelling, turn it off from this screen. The app will still work on Wi-Fi. 4. Check System Services Near the bottom of the app list, tap System Services if available. This can show data used by iPhone system features such as software services, push notifications, iCloud-related activity and other background functions. It is not always the main source of usage, but it is worth checking when data seems to be dropping faster than expected. 5. Check Current Period Roaming Look for Current Period Roaming on the same Mobile Data or Cellular screen. This will show you how much data has been used while roaming. When using a travel eSIM, roaming may be part of how the eSIM connects to local partner networks, depending on the product instructions. The key is to check roaming by line, not just assume all roaming is good or bad. TravelKon eSIM Checks Before You Fly Once the general iPhone usage screen has been checked, move on to the eSIM-specific checks. This is where the setup matters most. 1. Confirm Your iPhone Supports eSIM Before buying or installing an eSIM, check that your phone supports eSIM and is not locked to another provider. This is especially important for older iPhone models, imported devices, or phones purchased through a carrier plan. We have a guide on how to check phone eSIM support, which is a useful first step before setting up a TravelKon eSIM. 2. Label the eSIM Clearly After installing the eSIM, give it a practical name. Something like “TravelKon Japan”, “Europe eSIM” or “Travel Data” is much easier to manage than “Secondary”. This is particularly important when checking mobile data settings overseas. A clear label reduces the chance of selecting the wrong SIM by mistake. 3. Select the TravelKon eSIM for Mobile Data In Settings > Mobile Data or Settings > Cellular, check which line is selected for mobile data.

How to Check Your Data Usage on iPhone Read More »